Front-end implementation
In this section, we show the integration implementation for the front-end of the merchant application using our Sample Code.
Note
Please go through the Sample Code and implement that before continuing.
The following diagram shows the main files for the front-end, which can be found in the /resource folder in the /final project. Please check the directory tree if needed. The 3ds-web-adapter.js is our 3DS-web-adapter.

Process 1: Initialise the Authentication
To initialise authentication, the front-end needs to:
- Send a
Initialise authenticationmessage to the 3DS Requestor (Step. 1 and Step. 2). - Receive the response message and setup callback
iframe(Step. 5 and Step. 6).
When a user clicks the "Continue to checkout" button in the checkout page, it will trigger the browser sending information to the 3DS-web-adapter for initialising authentication (Step. 1). This is implemented in the checkout() function at checkout.html.
1 2 3 4 5 6 7 8 9 10 | //checkout.html function checkout() { ... $("#cardholderInfoCard").remove(); $("#checkoutCard").removeClass("d-none"); //move to result screen 2 seconds after //setTimeout(function () { window.location.href = "/auth/result"}, 2000); threeDSAuth(transId, cardHolderInfo, purchaseInfo); } |
The threeDSAuth() function is implemented in 3ds-web-adapter.js (Step. 2).
1 2 3 4 5 6 7 8 9 10 11 12 13 14 15 16 17 18 19 20 21 22 23 24 25 26 27 28 | //3ds-web-adapter.js function threeDSAuth(transId, cardHolderInfo, purchaseInfo) { var postData = {...} .... console.log('init authentication'); $.ajax({ url: '/auth/init', type: 'POST', contentType: "application/json", data: JSON.stringify(postData), success: function (data) { console.log('init auth returns:', data); $('<iframe id="threeds-container" width="0" height="0" style="visibility: hidden;" src="' + data.threeDSServerCallbackUrl + '"></iframe>') .appendTo('.challengeContainer'); }, error: function () { alert('error'); }, dataType: 'json' }); } |
The threeDSAuth() function makes a POST request to the 3DS Requestor with url /auth/init (line 10). The object is posted in JSON format. To check the 3DS Requestor handles this request, please refer here.
Note
threeDSAuth() can be modified according to your needs and you can transfer your objects instead of cardholderInfo, purchaseInfo and transId. The data structure can be found in the API document.
After a successful response from /auth/init (Step. 5) the 3ds-web-adapter.js inserts a hidden iframe into the checkout page (Step. 6) so that the browser information can be collected by the ACS and 3DS Server using the threeDSServerCallbackUrl (Step. 7) line 16 - 19.
Process 2: Execute Authentication
To execute authentication, the front-end needs to:
- Implement a
notify_3ds_events.html. - Send a
Execute authenticationmessage to the 3DS Requestor (Step. 8 and Step. 9). - Handle the authentication result with frictionless flow or challenge flow (Step. 13, Step. 14(F) or Step. 14(C)).
The notify_3ds_events.html is used to trigger the authentication process (Step. 8). The 3DS Requestor will render html below with variables transId, callbackType and an optional param. To check back-end implementation, please refer here.
1 2 3 4 5 6 7 8 9 10 11 12 13 14 15 16 17 18 19 20 21 22 23 24 25 26 27 28 29 30 31 32 33 | <!--notify_3ds_events.html--> <!DOCTYPE html> <html lang="en"> <head> <meta charset="UTF-8"/> <title>3DSecure 2.0 Authentication</title> </head> <body> <form> <input type="hidden" id="notifyCallback" name="notifyCallback" data-th-value="${callbackName}"/> <input type="hidden" id="transId" name="transId" data-th-value="${transId}"/> <input type="hidden" id="param" name="param" data-th-value="${callbackParam}"/> </form> <script src="https://code.jquery.com/jquery-3.3.1.min.js" integrity="sha256-FgpCb/KJQlLNfOu91ta32o/NMZxltwRo8QtmkMRdAu8=" crossorigin="anonymous"></script> <script> //notify parent checkout page to proceed with rest procedures. var callbackFn = parent[$('#notifyCallback').val()]; //callbackFn is defined in 3ds-notify handler method if (typeof callbackFn === 'function') { callbackFn($('#transId').val(),$('#param').val()); } </script> </body> </html> |
You can see that depending on the callbackName, it will call different methods in 3ds-web-adapter.js (Step. 8). The value of callbackName should be either _onThreeDSMethodFinished or _onThreeDSMethodSkipped. An explanation of each method is below:
_onThreeDSMethodFinished- notifies that the 3DS method is finished and calls_doAuth(), which means browser information collection is finished._onThreeDSMethodSkipped- notifies that the 3DS method has been skipped and calls_doAuth(), which means browser information collection by the ACS is skipped.
The _doAuth() in 3ds-web-adapter will make a POST request to /auth to execute authentication (Step. 9). To check 3DS Requestor handles the request, please refer here.
1 2 3 4 5 6 7 8 9 10 11 12 13 14 15 16 17 18 19 20 21 | //3ds-web-adapter.js function _doAuth(transId) { ... $.post("/auth", {id: transId}).done(function (data) { console.log('auth returns:', data); if (!data) { alert('error'); return; } switch (data.transStatus) { case "Y": authSuccess(data, transId); break; case "C": startChallenge(data.challengeUrl); break; ... } } |
The _doAuth() POSTs the request to /auth (line 4) and gets the result data. It then performs different flows based on the returned transStatus (line 14 and 17).
If the transStatus is Y, it means the authentication is successful. The 3DS-web-adapter will switch to the frictionless flow and execute the authSuccess() function (Step. 14(F)) which is the next process -> Get Authentication Result.
If the transStatus is C, the 3ds-web-adapter.js will call startChallenge(), which inserts an iframe for the challenge window with src set to challengeUrl (Step. 14(C)).
1 2 3 4 5 6 7 8 9 | function startChallenge(url) { //remove the spinner $(".spinner").remove(); //create the iframe $('<iframe src="'+url+'" class="h-100 w-100 border-0" id="challengeWindow" name="challengeWindow"></iframe>') .appendTo('.challengeContainer'); } |
Note
If you want to test the challenge scenario, follow the guide here.
You can see that iframe class has been set to h-100 and w-100, which is the bootstrap default class to implement css style of height: 100%!important and width: 100%!important respectively. This is required because the iframe needs to resize according to the content provided by the ACS. The challenge screen should look similar to the screenshot below:
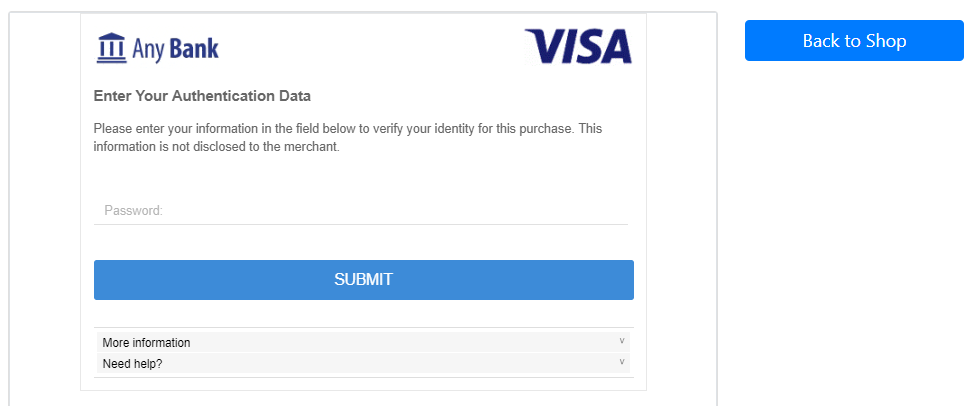
Info
In the real scenario the ACS will perform complex risk-based authentication from the information obtained about the cardholder, and is not as simple as checking the purchase amount. Similarly, the authentication method will be determined and implemented by the cardholders issuing bank.
Process 3: Get Authentication Result
To get authentication result, the front-end needs to:
- Send a
Request for authentication resultmessage to the 3DS Requestor (Step. 15(F) or Step. 20(C)). - Show result on screen (Step. 17(F) or Step. 22(C)).
When the authentication result is ready, the 3DS Requestor will notify the front-end using _onAuthResult message in notify_3ds_events.html. Then, 3ds-web-adapter sends Request for authentication result request to 3DS Requestor with url /auth/result in the following diagram. To check the 3DS Requestor handles the notify_3ds_events.html message, please refer here.
1 2 3 | function _onAuthResultReady(transId) { //redirect to result page window.location.href = "/auth/result?txid=" + transId; |
result.html page to show the result details of the authentication.1 2 3 4 5 6 7 8 9 10 11 12 13 14 15 16 17 18 19 20 21 22 23 | <div class="col-sm-8"> <div class="card"> <div class="card-header">Transaction successful</div> <div class="card-body"> <h4 class="card-title text-success">3D secure authentication was successful</h4> <p class="card-text">You may move onto authorization using the result below or you can press "Back To Home" to restart authentication process.</p> <dl class="row"> <dt class="col-sm-3">Trans Status</dt> <dd class="col-sm-9" data-th-text="${result.transStatus}">Y</dd> <dt class="col-sm-3">ECI</dt> <dd class="col-sm-9" data-th-text="${result.eci}">eci value</dd> <dt class="col-sm-3">CAVV</dt> <dd class="col-sm-9" data-th-text="${result.authenticationValue}">cavv value</dd> <dt class="col-sm-3">Other Info</dt> <dd class="col-sm-9"></dd> </dl> <a href="/" class="btn btn-primary">Back To Home</a> </div> </div> </div> |
The new result screen will look like the screenshot below: 
Success
Congratulations! You have done the front-end integration. After this process you normally move on to performing authorisation using the Transaction Status, ECI and CAVV to complete the transaction.
Whats next?
Please select the next button to learn about Back-end implementation for a 3DS Requestor.