Back-end implementation
In this section, we will show the implementation details for the back-end side of the merchant application using our Sample Code.
Note
Please go through the Sample Code and implement that before continuing.
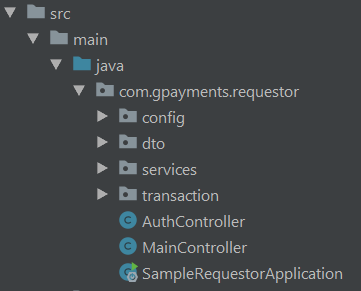
For the back-end, we need to implement a 3DS Requestor. The following diagram shows the main files in the 3DS Requestor, which can be found in the /final project of our Sample Code. Please check directory tree if needed.
The AuthController is our authentication controller which deals with requests from the 3DS-web-adapter and forwards them to ActiveServer, such as Step. 2 and Step. 3.
Process 1: Initialise the Authentication
To initialise authentication, the 3DS Requestor needs to:
- Handle the
Initialise authenticationrequest from the 3DS-web-adapter (Step. 2 and Step. 3). - Receive the response message and return it to the 3DS-web-adapter (Step. 4 and Step. 5).
In the AuthController, the 3DS Requestor implements a initAuth handler method with @PostMapping("/auth/init") to handle the Initialise authentication request. To check the front-end is sending this request, please refer here.
1 2 3 4 5 6 7 8 9 10 11 12 13 14 15 16 17 18 19 20 21 22 23 24 25 26 27 28 | public class AuthController { @PostMapping("/auth/init") public InitAuthResponseBRW initAuth(@RequestBody InitAuthRequestBRW request) { String initBrwUrl = THREE_DS_SERVER_URL + "/api/v1/auth/brw/init/pa"; // Initialise authentication by making POST request to /brw/init/{messageCategory} (Step. 3) RequestEntity<InitAuthRequestBRW> req = new RequestEntity<>(request, HttpMethod.POST, URI.create(initBrwUrl)); try { ResponseEntity<InitAuthResponseBRW> resp = restTemplate.exchange(req, InitAuthResponseBRW.class); InitAuthResponseBRW initRespBody = resp.getBody(); logger.info("initAuthResponseBRW {}", initRespBody); // set InitAuthResponseBRW for future use transactionInfo.setInitAuthResponseBRW(initRespBody); return initRespBody; } catch (HttpClientErrorException | HttpServerErrorException ex) { logger.error("initAuthReq failed, {}, {}", ex.getStatusCode(), ex.getResponseBodyAsString()); throw ex; } } } |
The initAuth handler method firstly initiates the url initBrwUrl = THREE_DS_SERVER_URL + ../brw/init/{messageCategory} (line 5). The request will be posted to this url (Step. 3).
Note
- The String
THREE_DS_SERVER_URLis the URL provided in the default configuration.THREE_DS_SERVER_URLis theAUTH_API_URLthat can be found inSettings > 3D Secure 2, for more details refer to here {messageCategory}can be eitherpaornpa, which represents payment authentication or non-payment authentication respectively. In this example, we are usingpa.
Then, initAuth controller posts the request and waits for the response in line 11 and 12. The data type for request and response are InitAuthRequestBRW and InitAuthResponseBRW, respectively.
InitAuthRequestBRW- Holds all the data necessary to make the API call to/brw/init/{messageCategory}(Step. 3).InitAuthResponseBRW- Holds the information about the response from the API call to/brw/init/{messageCategory}(Step. 4).
The data structure of InitAuthRequestBRW and InitAuthResponseBRW can be found in the API Document.
Note
The following two tips are important for your implementation of the 3DS Requestor.
Tip
The 3DS Requestor connects ActiveServer via SSL. To make an API call we need to attach the client certificate to the RESTTemplate.
- Make sure the client certificate (
.p12file) and thecacerts.jkstruststore file inside the/resources/certsdirectory. Please refer to the Introduction to obtain the.p12file. - The implementation of SSL configration is in
RestClientConfigclass. The class can be found inrequestor/configdirectory.
Tip
In this sample code, the 3DS Requestor fills the InitAuthRequestBRW request before sending it to the 3DS Server.
1 2 3 4 5 6 | //AuthController.java public InitAuthResponseBRW initAuth(@RequestBody InitAuthRequestBRW request) { ... fillInitAuthRequestBRW(request, THREE_DS_REQUESTOR_URL + "/3ds-notify"); ... } |
fillInitAuthRequestBRW method in the AuthController.java. This method fills the InitAuthRequestBRW with default data for the purpose of the demo. However, for production, you may replace this method to load data from your database or from cardholder information sent from the front-end.- The String
THREE_DS_REQUESTOR_URLis the URL provided in the default configuration, which ishttp://localhost:8082. You can update it with the URL of your hosted 3DS Requestor. - We set the
eventCallBackUrltoTHREE_DS_REQUESTOR_URL/3ds-notify. This allows the 3DS Server to make a notification when the browser information collection (Step. 7) is done.
Process 2: Execute Authentication
To execute authentication, the 3DS Requestor needs to:
Handle the
/3ds-notifymessage from ActiveServer after Step. 7.Handle the
Execute authenticationrequest from the 3DS-web-adapter (Step. 9 and Step. 10).Receive the authentication result and return it to the 3DS-web-adapter (Step. 12 and Step. 13).
When the browser information collection (Step. 7) is done, ActiveServer makes a notification to the eventCallBackUrl which we set to THREE_DS_REQUESTOR_URL/3ds-notify. The 3DS Requestor handles the notification in the MainController.java file.
1 2 3 4 5 6 7 8 9 10 11 12 13 14 15 16 17 18 19 20 21 22 23 24 25 26 27 28 29 | // MainController.java @PostMapping("/3ds-notify") public String notifyResult( @RequestParam("requestorTransId") String transId, @RequestParam("event") String callbackType, @RequestParam(name = "param", required = false) String param, Model model) { String callbackName; // check the callbackType and initialise callbackName if ("3DSMethodFinished".equals(callbackType)) { callbackName = "_on3DSMethodFinished"; } else if ("3DSMethodSkipped".equals(callbackType)) { callbackName = "_on3DSMethodSkipped"; } else { throw new IllegalArgumentException("invalid callback type"); } //Pass on the object to the page model.addAttribute("transId", transId); model.addAttribute("callbackName", callbackName); model.addAttribute("callbackParam", param); return "notify_3ds_events"; } |
This handler method takes in the parameter transId, callbackType and an optional param. callbackType can be 3DSMethodFinished or 3DSMethodSkipped. The handler method returns a String notify_3ds_events which means it returns an HTML page with the matching named notify_3ds_events.html. To check the front-end implementation of notify_3ds_events.html, please refer here.
In the AuthController, the 3DS Requestor implements an auth handler method with @PostMapping("/auth") to handle the Execute authentication request (Step. 9). This method makes a POST API request to /brw with threeDSRequestorTransID and threeDSServerTransID (Step. 10). ActiveServer will then initiate 3DS processing by creating and sending an AReq and processing the ARes when received in (Step. 11).
1 2 3 4 5 6 7 8 9 10 11 12 13 14 15 16 17 18 | //AuthController.java @PostMapping("/auth") public AuthResponseBRW auth(@RequestParam("id") String transId) { MerchantTransaction transaction = transMgr.findTransaction(transId); //create authentication request. AuthRequestBRW authRequest = new AuthRequestBRW(); authRequest.setThreeDSRequestorTransID(transaction.getId()); authRequest.setThreeDSServerTransID(transaction.getInitAuthResponseBRW().getThreeDSServerTransID()); String brwUrl = THREE_DS_SERVER_URL + "/api/v1/auth/brw"; AuthResponseBRW response = restTemplate.postForObject(brwUrl, authRequest, AuthResponseBRW.class); logger.info("authResponseBRW {}", response); return response; } |
The auth handler method returns the response to the front-end. The response contains a transStatus with value Y or C, which will trigger either frictionless flow or challenge flow. To check front-end handle transStatus, please refer to here. Moreover, to check the data structure of AuthRequestBRW and AuthResponseBRW, please refer to the API document.
Process 3: Get Authentication Result
To get the authentication result, the 3DS Requestor needs to:
- Handle the
Request for authentication resultrequest from the 3DS-web-adapter (Step. 15(F) or Step. 20(C)). - Send request to ActiveServer to get the result and return the result to the front-end. (Step. 16(F), Step. 17(F) or Step. 21(C), Step. 22(C)).
When the authentication result is ready, ActiveServer will send a notification via eventCallBackUrl. The 3DS Requestor handles the notification by returning an _onAuthResult message to notify_3ds_events.html. To check the front-end implementation for _onAuthResult message, please refer here.
1 2 3 4 5 6 7 8 9 10 11 12 | //MainController.java @PostMapping("/3ds-notify") public String notifyResult( ... if ("3DSMethodFinished".equals(callbackType)) { callbackName = "_on3DSMethodFinished"; } else if ("3DSMethodSkipped".equals(callbackType)) { callbackName = "_on3DSMethodSkipped"; } else if ("AuthResultReady".equals(callbackType)) { callbackName = "_onAuthResult"; } ... |
3DS Requestor implements a result handler method with @GetMapping("/auth/result") to handle the Request for authentication result message. This handler method requests the authentication result by calling /brw/result to ActiveServer and returns the result to the front-end. The front-end will display the result using the result.html page. To check the implementation at the front-end, please refer here.
1 2 3 4 5 6 7 8 9 10 11 12 | @GetMapping("/auth/result") public String result( @RequestParam("txid") String transId, Model model) { MerchantTransaction transaction = transMgr.findTransaction(transId); String resultUrl = AuthController.THREE_DS_SERVER_URL + "/api/v1/auth/brw/result?threeDSServerTransID=" + transaction.getInitAuthResponseBRW().getThreeDSServerTransID(); AuthResponseBRW response = restTemplate.getForObject(resultUrl, AuthResponseBRW.class); model.addAttribute("result", response); return "result"; } |
Success
Congratulations! You have done the back-end integration.
Whats next?
Please select the next button to go through the full Step by step guide for integrating a merchant website with a 3DS Requestor.