Step-by-step guide
This section illustrates how to implement the authentication processes to integrate the 3DS2 flow into the simple shopping site project you downloaded in the introduction section. It can also be used as a guide to adding the same functionality to your payment process.
Intellij IDEA is used throughout the tutorial.
If you learn better by working with finished code, you can access the final merchant checkout page integrated with 3DS2 from the GPayments sample code package in the /final folder. Please refer to the final demo code section for an overview of the 3DS Requestor demo code.
Info
The purpose of this guide is to help you understand the general flow of implementing 3DS Requestor using Java so that you can implement it in your checkout page, which may or may not be written in a different programming language.
Step 1: Initialise the Authentication
We will first explain the process to initialise authentication, in other words, to call /brw/init/{messageCategory}.
messageCategory can be either pa or npa, which represents payment authentication or non-payment authentication respectively.
Tip
Each API endpoint links to its reference in the Authentication API document document, which can be accessed for further information on API usage.
The GPayments sample code package contains a folder called /initial. Open this directory with your IDE, File > Open > Browse to initial folder > OK.


In addition, you are provided with 3ds-web-adapter.js to help you implement the process of authentication.
Copy and paste 3ds-web-adapter.js from the /final project to the /resources/static/js directory in the initial project. Create a js directory if necessary. If you are not sure where this file is located, take a look at the final code directory tree.
Add the line highlighted below to import the 3ds-web-adapter.js file into the checkout.html page.
1 2 3 4 5 6 7 8 9 10 11 12 | .... <script src="https://code.jquery.com/jquery-3.3.1.min.js" integrity="sha256-FgpCb/KJQlLNfOu91ta32o/NMZxltwRo8QtmkMRdAu8=" crossorigin="anonymous"></script> <script src="https://cdnjs.cloudflare.com/ajax/libs/popper.js/1.14.3/umd/popper.min.js" integrity="sha384-ZMP7rVo3mIykV+2+9J3UJ46jBk0WLaUAdn689aCwoqbBJiSnjAK/l8WvCWPIPm49" crossorigin="anonymous"></script> <script src="https://stackpath.bootstrapcdn.com/bootstrap/4.1.3/js/bootstrap.min.js" integrity="sha384-ChfqqxuZUCnJSK3+MXmPNIyE6ZbWh2IMqE241rYiqJxyMiZ6OW/JmZQ5stwEULTy" crossorigin="anonymous"></script> <script src="/js/3ds-web-adapter.js"></script> ..... |
Edit checkout.html to utilise the adapter. Take a look at the checkout() function in checkout.html, it should look like the code below. It is using JQuery to get the value of the cardholder input fields from the HTML document and initialising the new variables transId, cardHolderInfo and purchaseInfo:
1 2 3 4 5 6 7 8 9 10 11 12 13 14 15 16 17 18 19 20 21 22 23 24 25 26 27 | //checkout.html function checkout() { var transId = $('#transId').val(); // NOTE: Some attributes are set to default values for demo purpose var cardHolderInfo = {}; if($('#billAddrLine1').val()) { cardHolderInfo.billAddrLine1 = $('#billAddrLine1').val(); } .... if($('#cardExpiry').val()) { purchaseInfo.expiryDate = $('#expiryDate').val(); } //remove cardholder information class, checkout button and show spinner effect $("#checkoutButton").remove(); $("#cardholderInfoCard").remove(); $("#checkoutCard").removeClass("d-none"); //move to result screen 2 seconds after for demo purposes setTimeout(function () { window.location.href = "/auth/result" }, 2000); } |
Add the highlighted line inside the checkout() in checkout.html to call the method threeDSAuth() (Step.1), which is the start of the authentication process.
1 2 3 4 5 6 7 8 9 | function checkout() { ... $("#cardholderInfoCard").remove(); $("#checkoutCard").removeClass("d-none"); //move to result screen 2 seconds after setTimeout(function () { window.location.href = "/auth/result"}, 2000); threeDSAuth(transId, cardHolderInfo, purchaseInfo); } |
1 2 3 4 5 6 7 8 | function checkout() { ... $("#cardholderInfoCard").remove(); $("#checkoutCard").removeClass("d-none"); //setTimeout(function () { window.location.href = "/auth/result"}, 2000); threeDSAuth(transId, cardHolderInfo, purchaseInfo); } |
Note
The code below is the threeDSAuth() function defined in 3ds-web-adapter.js. You can see that threeDSAuth() sends objects from the page in JSON format to /auth/init line 10, e.g. threeDSRequestorTransID is initialised by transId.
1 2 3 4 5 6 7 8 9 10 11 12 13 14 15 16 17 18 19 20 21 22 23 24 25 26 27 28 | //3ds-web-adapter.js function threeDSAuth(transId, cardHolderInfo, purchaseInfo) { var postData = {...} .... console.log('init authentication'); $.ajax({ url: '/auth/init', type: 'POST', contentType: "application/json", data: JSON.stringify(postData), success: function (data) { console.log('init auth returns:', data); $('<iframe id="threeds-container" width="0" height="0" style="visibility: hidden;" src="' + data.threeDSServerCallbackUrl + '"></iframe>') .appendTo('.challengeContainer'); }, error: function () { alert('error'); }, dataType: 'json' }); } |
threeDSAuth() can be modified according to your needs and you can transfer your objects instead of cardholderInfo, purchaseInfo and transId. The types of data elements that can be sent are in InitAuthRequestBRW, which is inside the /dto/activeserver directory in the final code or alternatively you can check the API document.
3ds-web-adapter.js makes a POST request to /auth/init (Step.2), so a new controller class to handle this request is required.
You will need to create a controller to handle requests from the client side which handles the /auth/init request. Create a new controller class AuthController.java in the /java/sample_requestor directory. Copy and Paste the initAuth method which handles the /auth/init request and calls the Authentication API endpoint /api/v1/{messageCategory}.
1 2 3 4 5 6 7 8 9 10 11 12 13 14 15 16 17 18 19 20 21 22 23 24 25 26 27 | public class AuthController { @PostMapping("/auth/init") public InitAuthResponseBRW initAuth(@RequestBody InitAuthRequestBRW request) { String initBrwUrl = THREE_DS_SERVER_URL + "/api/v1/auth/brw/init/{messageCategory}"; // Initialise authentication by making POST request to /brw/init/{messageCategory} (Step. 3) RequestEntity<InitAuthRequestBRW> req = new RequestEntity<>(request, HttpMethod.POST, URI.create(initBrwUrl)); try { ResponseEntity<InitAuthResponseBRW> resp = restTemplate.exchange(req, InitAuthResponseBRW.class); InitAuthResponseBRW initRespBody = resp.getBody(); logger.info("initAuthResponseBRW {}", initRespBody); // set InitAuthResponseBRW for future use transactionInfo.setInitAuthResponseBRW(initRespBody); return initRespBody; } catch (HttpClientErrorException | HttpServerErrorException ex) { logger.error("initAuthReq failed, {}, {}", ex.getStatusCode(), ex.getResponseBodyAsString()); throw ex; } } } |
Replace {messageCategory} with pa if you want to initialise payment authentication, or npa if you want to initialise non-payment authentication. In this case, we are using pa.
1 2 3 4 5 6 7 | //AuthController.java String initBrwUrl = THREE_DS_SERVER_URL + "/api/v1/auth/brw/init/pa"; // Initialise authentication by making POST request to /brw/init/{messageCategory} (Step. 3) InitAuthResponseBRW initAuthResponseBRW = restTemplate.postForObject(initBrwUrl, request, InitAuthResponseBRW.class); .... |
Replace the String THREE_DS_SERVER_URL with the URL provided in the default configuration. THREE_DS_SERVER_URL is the AUTH_API_URL that can be found in Settings > 3D Secure 2, for more details refer to here
1 2 3 | //AuthController.java private final String THREE_DS_SERVER_URL = "https://api.as.testlab.3dsecure.cloud:7443"; .... |
Replace the String THREE_DS_REQUESTOR_URL with the URL provided in the default configuration, or update it with the URL of your hosted 3DS Requestor.
1 2 3 | //AuthController.java private final String THREE_DS_REQUESTOR_URL = "http://localhost:8082"; .... |
Copy and paste the folder activeserver into the /java/sample_requestor/dto directory. This folder contains all the classes necessary to make the API calls. To initialise authentication, the following classes are the most important:
InitAuthRequestBRW- Holds all the data necessary to make the API call to/brw/init/{messageCategory}(Step. 3).InitAuthResponseBRW- Holds the information about the response to the API call/brw/init/{messageCategory}(Step. 4).
Now take a look at the fillInitAuthRequestBRW method in the AuthController.java. This method fills the InitAuthRequestBRW with default data for the purpose of the demo. However, for production, you may replace this method to load data from your database or from cardholder information sent from checkout.html.
1 2 3 4 5 6 7 8 9 10 11 12 13 14 15 16 17 18 19 20 21 22 23 24 25 26 27 28 29 30 31 32 33 34 35 36 37 38 39 40 41 42 43 44 45 46 47 48 49 50 51 52 53 54 55 56 57 58 59 60 61 62 63 64 65 66 67 68 69 70 71 72 73 | //AuthController.java /** * This method is to fill in the InitAuthRequestBRW with demo data, you need to fill the information from your database * @param initAuthRequestBRW * @param eventCallBackUrl */ private void fillInitAuthRequestBRW(InitAuthRequestBRW initAuthRequestBRW, String eventCallBackUrl) { initAuthRequestBRW.setAcctID("personal account"); // Fill AcctInfo with default data. AcctInfo acctInfo = new AcctInfo(); acctInfo.setChAccAgeInd("03"); acctInfo.setChAccChange("20160712"); acctInfo.setChAccChangeInd("04"); acctInfo.setChAccDate("20140328"); acctInfo.setChAccPwChange("20170328"); acctInfo.setChAccPwChangeInd("02"); acctInfo.setNbPurchaseAccount("11"); acctInfo.setPaymentAccAge("20160917"); acctInfo.setPaymentAccInd("02"); acctInfo.setProvisionAttemptsDay("3"); acctInfo.setShipAddressUsage("20160714"); acctInfo.setShipAddressUsageInd("02"); acctInfo.setShipNameIndicator("02"); acctInfo.setSuspiciousAccActivity("02"); acctInfo.setTxnActivityDay("1"); acctInfo.setTxnActivityYear("21"); initAuthRequestBRW.setAcctInfo(acctInfo); initAuthRequestBRW.setAcctType("03"); initAuthRequestBRW.setAuthenticationInd("01");//01 = Payment transaction // fills ThreeDSRequestorAuthenticationInfo ThreeDSRequestorAuthenticationInfo threeDSRequestorAuthenticationInfo = new ThreeDSRequestorAuthenticationInfo(); threeDSRequestorAuthenticationInfo.setThreeDSReqAuthData("login GP"); threeDSRequestorAuthenticationInfo.setThreeDSReqAuthMethod("02"); threeDSRequestorAuthenticationInfo.setThreeDSReqAuthTimestamp("201711071307"); initAuthRequestBRW.setAuthenticationInfo(threeDSRequestorAuthenticationInfo); // fills MerchantRiskIndicator, optional but strongly recommended for the accuracy of risk based authentication MerchantRiskIndicator merchantRiskIndicator = new MerchantRiskIndicator(); merchantRiskIndicator.setDeliveryEmailAddress("test@123.com"); merchantRiskIndicator.setDeliveryTimeframe("02"); merchantRiskIndicator.setGiftCardAmount("123"); merchantRiskIndicator.setGiftCardCount("02"); merchantRiskIndicator.setGiftCardCurr("840"); merchantRiskIndicator.setPreOrderDate("20170519"); merchantRiskIndicator.setPreOrderPurchaseInd("02"); merchantRiskIndicator.setReorderItemsInd("01"); merchantRiskIndicator.setShipIndicator("01"); initAuthRequestBRW.setMerchantRiskIndicator(merchantRiskIndicator); /** * Options for threeDSRequestorChallengeInd - Indicates whether a challenge is requested for this transaction. * Values accepted: * 01 = No preference * 02 = No challenge requested * 03 = Challenge requested: 3DS Requestor Preference * 04 = Challenge requested: Mandate * 05–79 = Reserved for EMVCo future use (values invalid until defined by EMVCo) * 80-99 = Reserved for DS use */ initAuthRequestBRW.setChallengeInd("01"); initAuthRequestBRW.setEventCallbackUrl(eventCallBackUrl); //Set this to your url initAuthRequestBRW.setMerchantId("123456789012345"); initAuthRequestBRW.setPurchaseDate(LocalDateTime.now().format(DateTimeFormatter.ofPattern("yyyyMMddHHmmss"))); initAuthRequestBRW.setPurchaseInstalData("24"); initAuthRequestBRW.setRecurringExpiry("20180131"); initAuthRequestBRW.setRecurringFrequency("6"); initAuthRequestBRW.setTransType("03"); } |
Add a new variable initAuthResponseBRW to MerchantTransaction.java and corresponding getter and setter methods.
1 2 3 4 5 6 7 8 9 10 11 12 13 14 15 16 17 18 | //MerchantTransaction.java import com.gpayments.requestor.requestor.dto.activeserver.InitAuthResponseBRW; public class MerchantTransaction { private InitAuthResponseBRW initAuthResponseBRW; ... //getter public InitAuthResponseBRW getInitAuthResponseBRW() { return initAuthResponseBRW; } //setter public void setInitAuthResponseBRW(InitAuthResponseBRW initAuthResponseBRW) { this.initAuthResponseBRW = initAuthResponseBRW; } |
To make an API call to ActiveServer we will need to attach the client certificate to the RESTTemplate.
Copy and paste the client certificate (.p12 file) to the /resources/certs directory. Create the /certs directory if not present. See this section for more information on getting the client certificate.
Copy and paste the cacerts.jks truststore file inside the final code to /resources/certs directory. A certificate is required because your 3DS Requestor and the 3DS Server need to be mutually authenticated to allow mutual SSL authentication.
Copy and Paste a configuration class RestClientConfig.java from the final package to the /java/sample_requestor/config directory. This class is an example of how to load the client certificate to a HttpClient. It loads the keystore file you have downloaded from ActiveServer with the truststore provided by GPayments.
1 2 3 4 5 6 7 8 9 10 11 12 13 14 15 16 17 18 19 20 21 22 23 24 25 26 27 28 29 30 31 32 | //RestClientConfig.java @Configuration public class RestClientConfig { private static final String KEYSTORE_PASSWORD = "123456"; private static final String CA_CERTS_FILE_NAME = "certs/cacerts.jks"; private static final String CLIENT_CERTS_FILE_NAME = "certs/client_certificate.p12"; @Bean public RestTemplate restTemplate() throws IOException, UnrecoverableKeyException, CertificateException, NoSuchAlgorithmException, KeyStoreException, KeyManagementException { SSLContext sslContext = SSLContextBuilder.create() .loadKeyMaterial( new ClassPathResource(CLIENT_CERTS_FILE_NAME).getURL(), KEYSTORE_PASSWORD.toCharArray(), KEYSTORE_PASSWORD.toCharArray()) .loadTrustMaterial( new ClassPathResource(CA_CERTS_FILE_NAME).getURL(), KEYSTORE_PASSWORD.toCharArray()) .build(); CloseableHttpClient client = HttpClients.custom() .setSSLContext(sslContext) .build(); HttpComponentsClientHttpRequestFactory httpRequestFactory = new HttpComponentsClientHttpRequestFactory(client); return new RestTemplate(httpRequestFactory); } } |
KEYSTORE_PASSWORD with the password provided in the default configuration. If your ActiveServer is a in-house software, this will be the password you have provided when downloading the client certificate from the merchants page in Admin dashboard. For more details on downloading the client certificate please refer to Merchant Security.
1 2 | //RestClientConfig.java private String KEYSTORE_PASSWORD = "123456"; |
Info
This is a Java specific way to make a RESTFul API request with a client certificate. You will need to take similar steps if you are using a different language to implement the server-side code so that your 3DS requestor is mutually authenticated with the 3DS server.
Add the following dependency to pom.xml to get Apache HttpClient, which is required for the SSLContextBuilder class.
1 2 3 4 5 6 7 8 | <dependencies> ... <dependency> <groupId>org.apache.httpcomponents</groupId> <artifactId>httpclient</artifactId> <version>4.5.6</version> </dependency> </dependencies> |
Run the app again then access from http://localhost:8082 and go through the checkout process. You should get a successful response for /api/v1/auth/brw/init/{messageCategory}
with a valid threeDSServerCallbackUrl in the log, which should look similar to this:
1 2 3 4 | { "threeDSServerCallbackUrl":"https://admin.as.testlab.3dsecure.cloud/api/v1/auth/brw/callback?transId=cbc559c0-96bd-4078-be3c-ea0cc80686f0&t=ZIIgV2LqMak5ONQ1w3l3akfpZlMPftFlOE5Garat6lHiJ3T2Kq2vULuLhIQ7l5UKzpnNpztx", "threeDSServerTransID":"ade87add-b50c-42da-bbea-cdcbd85dcbf3" } |
The checkout process will stop at the 3ds-notify stage because this has not been implemented yet, we will handle this in the next section.
Tip
You need to rerun the project for the changes to be propagated. Terminate the currently running app using CTRL+C and rerun the project by
typing in the command line:
1 | mvn spring-boot:run |
The 3DS server and ACS collects the necessary browser information for risk-based authentication through the callback URL and 3DS method respectively.
Note
After a successful response from /auth/init (Step. 5) the 3ds-web-adapter.js inserts a hidden iframe into the checkout page (Step. 6) so that the browser information can be collected by the ACS and 3DS Server using the threeDSServerCallbackUrl (Step. 7).
1 2 3 4 5 | //3ds-web-adapter.js success: function(data) { $('<iframe id="threeds-container" width="0" height="0" style="visibility: hidden;" src="'+ data.threeDSServerCallbackUrl+'"></iframe>') .appendTo('.challengeContainer'); }, |
Process 2: Execute authentication
In the previous step, 3ds-web-adapter.js inserted an iframe with callback src set to threeDSServerCallbackUrl, this allows the 3DS Server to make callbacks to the browser (Step. 7) to collect necessary browser information.
Additionally, we called /brw/init/{messageCategory} with eventCallBackUrl set to THREE_DS_REQUESTOR_URL/3ds-notify (line. 2). This allows the 3DS server to make a notification when the browser information collection is done.
1 2 3 | //AuthController.java fillInitAuthRequestBRW(request, THREE_DS_REQUESTOR_URL + "/3ds-notify"); ..... |
Therefore, we need to make a handler method to accept this API call.
Add the following code to MainController.java.
This handler method takes in the parameter transId, callbackType and an optional param. callbackType can be 3DSMethodFinished or 3DSMethodSkipped. The handler method returns a String notify_3ds_events. To explain, if you are not familiar with Springboot, this means it returns an HTML page with the matching name from the /resources/templates directory.
1 2 3 4 5 6 7 8 9 10 11 12 13 14 15 16 17 18 19 20 21 22 23 24 25 26 27 28 29 | // MainController.java @PostMapping("/3ds-notify") public String notifyResult( @RequestParam("requestorTransId") String transId, @RequestParam("event") String callbackType, @RequestParam(name = "param", required = false) String param, Model model) { String callbackName; // check the callbackType and initialise callbackName if ("3DSMethodFinished".equals(callbackType)) { callbackName = "_on3DSMethodFinished"; } else if ("3DSMethodSkipped".equals(callbackType)) { callbackName = "_on3DSMethodSkipped"; } else { throw new IllegalArgumentException("invalid callback type"); } //Pass on the object to the page model.addAttribute("transId", transId); model.addAttribute("callbackName", callbackName); model.addAttribute("callbackParam", param); return "notify_3ds_events"; } |
Create a new HTML file called notify_3ds_events.html in the /resources/templates directory to call callbackFn, which is the page returned by a call to /3ds-notify.
1 2 3 4 5 6 7 8 9 10 11 12 13 14 15 16 17 18 19 20 21 22 23 24 25 26 27 28 29 30 31 32 33 | <!--notify_3ds_events.html--> <!DOCTYPE html> <html lang="en"> <head> <meta charset="UTF-8"/> <title>3DSecure 2.0 Authentication</title> </head> <body> <form> <input type="hidden" id="notifyCallback" name="notifyCallback" data-th-value="${callbackName}"/> <input type="hidden" id="transId" name="transId" data-th-value="${transId}"/> <input type="hidden" id="param" name="param" data-th-value="${callbackParam}"/> </form> <script src="https://code.jquery.com/jquery-3.3.1.min.js" integrity="sha256-FgpCb/KJQlLNfOu91ta32o/NMZxltwRo8QtmkMRdAu8=" crossorigin="anonymous"></script> <script> //notify parent checkout page to proceed with rest procedures. var callbackFn = parent[$('#notifyCallback').val()]; //callbackFn is defined in 3ds-notify handler method if (typeof callbackFn === 'function') { callbackFn($('#transId').val(),$('#param').val()); } </script> </body> </html> |
callbackName provided by the 3DS Server, it will call different methods in 3ds-web-adapter.js (Step. 8).
An explanation of each method is below:
_onThreeDSMethodFinished- notifies that the 3DS method is finished and calls_doAuth(), which means browser information collection is finished._onThreeDSMethodSkipped- notifies that the 3DS method has been skipped and calls_doAuth(), which means browser information collection by the ACS is skipped.
The _doAuth() in 3ds-web-adapter will make a POST request to /auth to execute authentication (Step. 9).
Add a new handler method in AuthController.java to handle this request.
This method should make a POST API request to /brw with threeDSRequestorTransID and threeDSServerTransID (Step. 10). The 3DS Server will then initiate 3DS processing by creating and sending an AReq and processing the ARes when received in (Step. 11).
1 2 3 4 5 6 7 8 9 10 11 12 13 14 15 16 17 18 | //AuthController.java @PostMapping("/auth") public AuthResponseBRW auth(@RequestParam("id") String transId) { MerchantTransaction transaction = transMgr.findTransaction(transId); //create authentication request. AuthRequestBRW authRequest = new AuthRequestBRW(); authRequest.setThreeDSRequestorTransID(transaction.getId()); authRequest.setThreeDSServerTransID(transaction.getInitAuthResponseBRW().getThreeDSServerTransID()); String brwUrl = THREE_DS_SERVER_URL + "/api/v1/auth/brw"; AuthResponseBRW response = restTemplate.postForObject(brwUrl, authRequest, AuthResponseBRW.class); logger.info("authResponseBRW {}", response); return response; } |
Rerun your app and go through the checkout process with default values, you should get a successful response for /api/v1/auth/brw (Step. 12), which will have transStatus set to Y.
1 2 3 4 5 6 | { "authenticationValue":"YXV0aCB2YWx1ZSB4eHh4eHh4eHg=", "eci":"06", "threeDSServerTransID":"52056514-7504-40c7-886f-2a0452d8edbd", "transStatus":"Y" } |
If you want to test the challenge scenario, try purchasing more than $100 worth of goods, for example add 50 pineapple to the cart. The ACS will determine this transaction as challenge is required, which allows challenge flow to be started.
The response of API call to /brw will have a challengeUrl set and a transStatus set to C.
1 2 3 4 5 6 7 | { "acsChallengeMandated":"Y", "authenticationType":"01", "challengeUrl":"https://admin.as.testlab.3dsecure.cloud/api/v1/auth/brw/challenge/init?txid=78cd5068-96ea-48c4-b013-e6843fa8b2e4", "threeDSServerTransID":"c8a32fb7-9556-4242-896b-562ee8ca25df", "transStatus":"C", } |
The one time pass code requested in the challenge window is 123456. However, you will get an error because we have not yet implemented handling the callbackType AuthResultReady, which we will implement in the next step.
Note
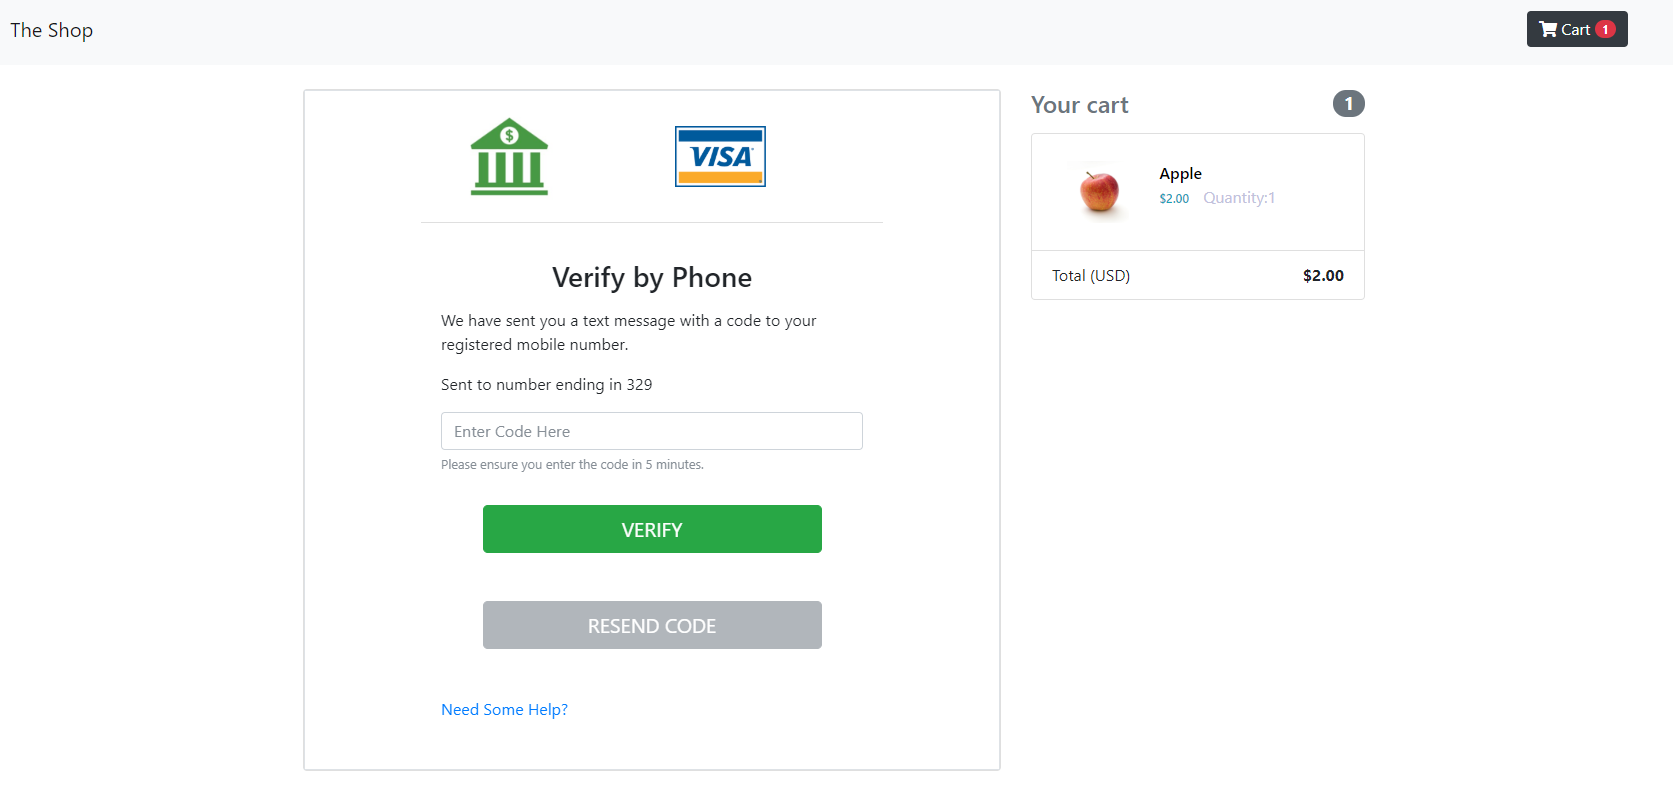
If the transStatus is C, the 3ds-web-adapter.js will call startChallenge(url), which is going to insert an iframe for the challenge window with src set to challengeUrl (Step. 14(C)).
1 2 3 4 5 6 7 8 9 | function startChallenge(url) { //remove the spinner $(".spinner").remove(); //create the iframe $('<iframe src="'+url+'" class="h-100 w-100 border-0" id="challengeWindow" name="challengeWindow"></iframe>') .appendTo('.challengeContainer'); } |
You can see that iframe class has been set to h-100 and w-100, which is the bootstrap default class to implement css style of height: 100%!important and width: 100%!important respectively. This is required because the iframe needs to resize according to the content provided by the ACS. The challenge screen should look similar to the screenshot below:
Info
In the real scenario the ACS will perform complex risk-based authentication from the information obtained about the cardholder, and is not as simple as checking the purchase amount. Similarly, the authentication method will be determined and implemented by the cardholders issuing bank.
Process 3: Get Authentication result updates
As mentioned in the previous step, we now need to request for a result update of the authentication so that it can be displayed to the cardholder, this is also required in the frictionless flow (see the warning section below).
Why a separate result request is necessary?
For the Frictionless flow, you may wonder why you need to request the result again since you already have the result of authentication available in Step. 12.
This is because the authentication result is returned to the authentication page in Step. 13 by the 3DS Requestor. It is common that the authentication result page is shown as a separate page from the checkout page. In this case, the 3ds-web-adapter could transfer the result back to the 3DS Requestor or the result page, however, it is not a recommended data flow as the authentication result is re-transferred by the client side code and is in general considered as insecure.
The server-side of 3DS Requestor should always have its own mechanism to get the result back from the origin source: the 3DS Server. Instead of transferring the result to the new result page, the 3DS Requestor server-side can provide a result page that shows the authentication result. Therefore, you need to request for a result receipt in this step.
For the challenge flow, the result of the authentication will be notified by the 3DS server through the 3ds-notify endpoint, similar to how it notified the status of 3DS method.
Add a new else if statement, highlighted below, to handle "AuthResultReady" callbackType inside MainController.java.
1 2 3 4 5 6 7 8 | //MainController.java if ("3DSMethodFinished".equals(callbackType)) { callbackName = "_on3DSMethodFinished"; } else if ("3DSMethodSkipped".equals(callbackType)) { callbackName = "_on3DSMethodSkipped"; } else if ("AuthResultReady".equals(callbackType)) { callbackName = "_onAuthResult"; } |
_onAuthResultReady is called from notify-3ds-events. This will redirect the window to /auth/result?txid=+transId.
If you would like to get the result of the authentication, you can request the resulting receipt inside the handler /auth/result by calling /brw/result.
1 2 3 4 5 6 7 8 9 10 11 12 | @GetMapping("/auth/result") public String result( @RequestParam("txid") String transId, Model model) { MerchantTransaction transaction = transMgr.findTransaction(transId); String resultUrl = AuthController.THREE_DS_SERVER_URL + "/api/v1/auth/brw/result?threeDSServerTransID=" + transaction.getInitAuthResponseBRW().getThreeDSServerTransID(); AuthResponseBRW response = restTemplate.getForObject(resultUrl, AuthResponseBRW.class); model.addAttribute("result", response); return "result"; } |
result.html.
1 2 3 4 5 6 7 8 9 10 11 12 | <div class="col-sm-8"> <div class="card"> <div class="card-header">Transaction successful</div> <div class="card-body"> <!--<h4 class="card-title text-success">Thank you for your purchase!</h4>--> <!--<p class="card-text">Want to continue shopping? Press "Back to Home".</p>--> <a href="/" class="btn btn-primary btn-block">Back to Home</a> </div> </div> </div> |
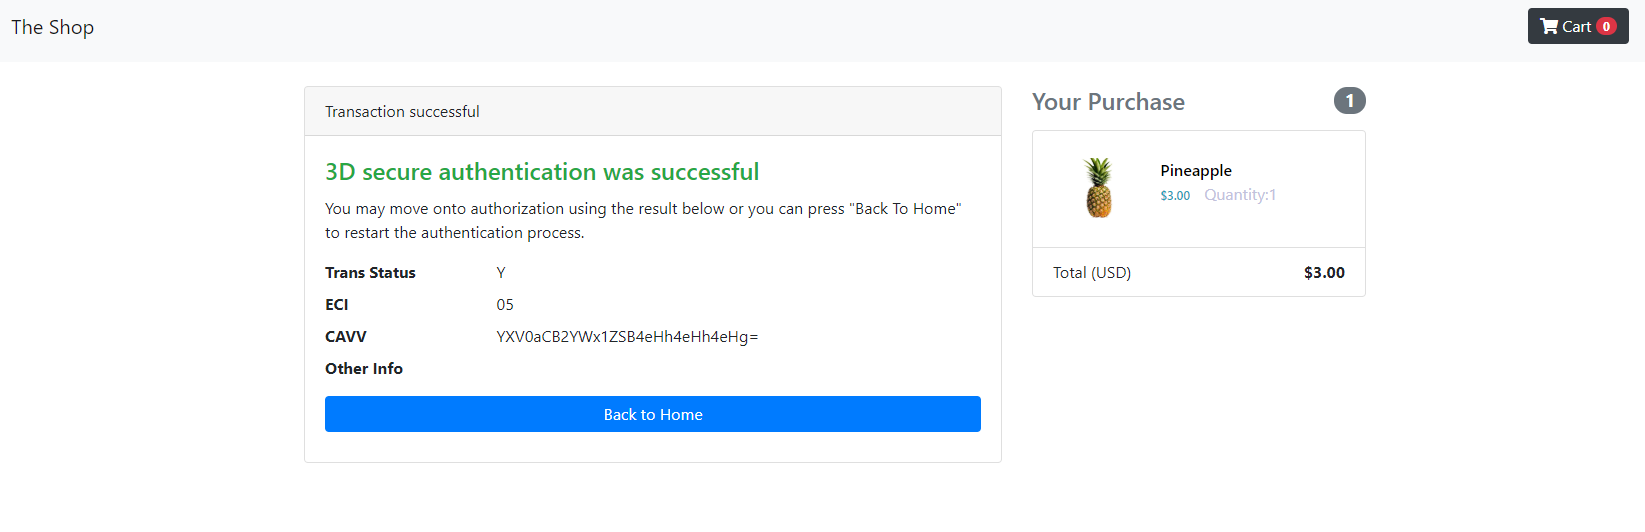
Add the following highlighted code instead to result.html, to show the result of the authentication and more description.
1 2 3 4 5 6 7 8 9 10 11 12 13 14 15 16 17 18 19 20 21 22 23 | <div class="col-sm-8"> <div class="card"> <div class="card-header">Transaction successful</div> <div class="card-body"> <h4 class="card-title text-success">3D secure authentication was successful</h4> <p class="card-text">You may move onto authorization using the result below or you can press "Back To Home" to restart authentication process.</p> <dl class="row"> <dt class="col-sm-3">Trans Status</dt> <dd class="col-sm-9" data-th-text="${result.transStatus}">Y</dd> <dt class="col-sm-3">ECI</dt> <dd class="col-sm-9" data-th-text="${result.eci}">eci value</dd> <dt class="col-sm-3">CAVV</dt> <dd class="col-sm-9" data-th-text="${result.authenticationValue}">cavv value</dd> <dt class="col-sm-3">Other Info</dt> <dd class="col-sm-9"></dd> </dl> <a href="/" class="btn btn-primary">Back To Home</a> </div> </div> </div> |
Success
Congratulations! You now have a working merchant checkout page integrated with ActiveServer. Try running the app again and you should see a successful result page with Trans Status, ECI and CAVV.
The new result screen will look like the screenshot below:
Tip
After this process you normally move on to performing authorisation using the Transaction Status, ECI and CAVV to complete the transaction.
Final demo code
The final demo code can be accessed from the GPayments sample code package in the /final folder. It will work out-of-box with ActiveServer using the default configuration. Simply run the app by following this guide.
Summary of final 3DS Requestor demo code
3DS Requestor demo code implements several endpoints and components, as described below:
-
/auth/init- Called by the3ds-web-adapter.js, this endpoint accepts authentication initialisation request to trigger the 3DS2 authentication process. In the 3DS Requestor, it calls ActiveServer's authentication initialisation api/api/v1/auth/brw/init/{messageCategory}. -
/auth- Called by the3ds-web-adapter.js, this endpoint accepts authentication request to execute 3DS2 authentication after browser information collecting, and optional 3DS method execution. In the 3DS Requestor, it calls ActiveServer's authentication api/api/v1/auth/brw. -
/3ds-notify- Allows ActiveServer to notify the 3DS Requestor about status of 3DS method execution , authentication and challenge results. -
3ds-web-adapter.js- Simple javascript library created for 3DS Requestor process scaffolding. -
Classes under package
com.gpayments.requestor.dto.activeserver- ActiveServer API DTO (Data Transfer Object).
When integrated with merchant website, 3DS Requestor demo code provides the 3ds-web-adapter for the merchant site to integrate it in the checkout page. Merchant website fills the cardholder information by calling threeDSAuth() in 3ds-web-adapter.js to start the authentication process. Merchant website will also need to provide an iframe for the 3DS Requestor to populate associate callback url and 3DS method to execute.
Authentication result will be provided by the 3DS Requestor at the end of the authentication process through the event callback url /3ds-notify. Payment gateway or the merchant can proceed to the authorization process from here.
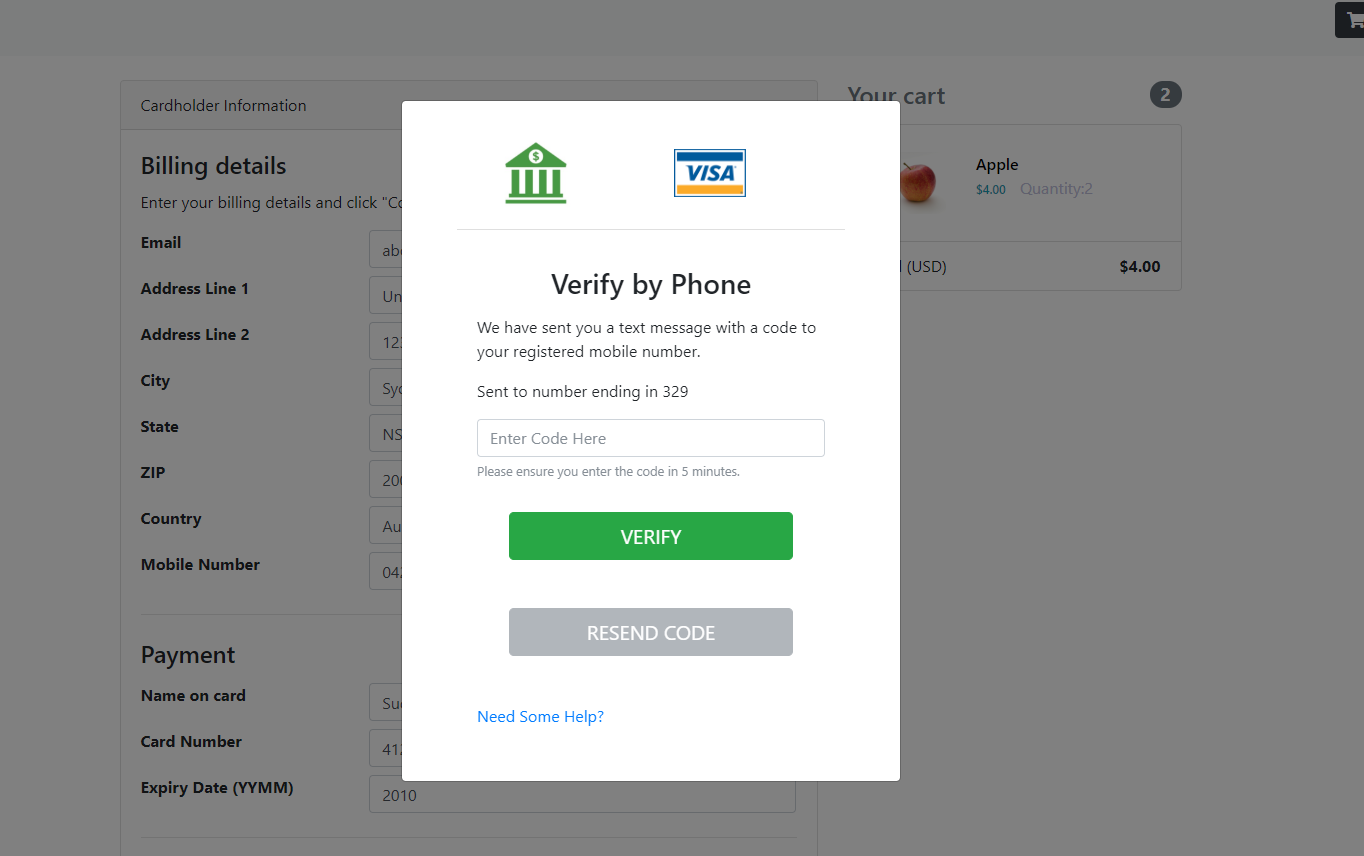
Lightbox challenge window
In the tutorial, the challenge screen was inline, however, depending on your website design, you may want to provide the challenge window inside a popup. The UI itself is provided by the ACS so you don't need to worry about implementing that.
Open checkout.html, and find the following section of code, where it defines the challenge window.
1 2 3 4 5 6 7 8 9 10 11 12 13 14 15 16 17 18 19 20 21 22 23 24 | <!--checkout.html--> <div class="card d-none" id="checkoutCard"> <div class="challengeContainer border"> <div class="spinner row h-100 justify-content-center align-items-center"> <div class="col"> <div class="sk-fading-circle"> <div class="sk-circle1 sk-circle"></div> <div class="sk-circle2 sk-circle"></div> <div class="sk-circle3 sk-circle"></div> <div class="sk-circle4 sk-circle"></div> <div class="sk-circle5 sk-circle"></div> <div class="sk-circle6 sk-circle"></div> <div class="sk-circle7 sk-circle"></div> <div class="sk-circle8 sk-circle"></div> <div class="sk-circle9 sk-circle"></div> <div class="sk-circle10 sk-circle"></div> <div class="sk-circle11 sk-circle"></div> <div class="sk-circle12 sk-circle"></div> </div> <div class="text-center"><img class="w-25" src="images/visa-logo.png"/></div> </div> </div> </div> </div> |
1 2 3 4 5 6 7 8 9 10 11 12 13 14 15 16 17 18 19 20 21 22 23 24 25 26 | <!--checkout.html--> <!--<div class="card d-none" id="checkoutCard">--> <!--<div class="challengeContainer border">--> <div class="spinner row h-100 justify-content-center align-items-center"> <div class="col"> <div class="sk-fading-circle"> <div class="sk-circle1 sk-circle"></div> <div class="sk-circle2 sk-circle"></div> <div class="sk-circle3 sk-circle"></div> <div class="sk-circle4 sk-circle"></div> <div class="sk-circle5 sk-circle"></div> <div class="sk-circle6 sk-circle"></div> <div class="sk-circle7 sk-circle"></div> <div class="sk-circle8 sk-circle"></div> <div class="sk-circle9 sk-circle"></div> <div class="sk-circle10 sk-circle"></div> <div class="sk-circle11 sk-circle"></div> <div class="sk-circle12 sk-circle"></div> </div> <div class="text-center"><img class="w-25" src="images/visa-logo.png"/></div> </div> </div> </div> </div> <!--Cardholder information --> <div class="card" id="cardholderInfoCard"> |
1 2 3 4 5 6 7 8 9 10 11 12 13 14 15 16 17 18 19 20 21 22 23 24 25 26 27 28 29 30 31 32 33 | <!--checkout.html--> <!--<div class="card d-none" id="checkoutCard">--> <!--<div class="challengeContainer border">--> <div class="modal fade" id="authBox" data-backdrop="static" data-keyboard="false" tabindex="-1" role="dialog" aria-labelledby="exampleModalLabel" aria-hidden="true"> <div class="modal-dialog h-100 d-flex flex-column justify-content-center my-0" role="document"> <div class="modal-content"> <div class="modal-body challengeContainer"> <div class="spinner row h-100 justify-content-center align-items-center"> <div class="col"> <div class="sk-fading-circle"> <div class="sk-circle1 sk-circle"></div> <div class="sk-circle2 sk-circle"></div> <div class="sk-circle3 sk-circle"></div> <div class="sk-circle4 sk-circle"></div> <div class="sk-circle5 sk-circle"></div> <div class="sk-circle6 sk-circle"></div> <div class="sk-circle7 sk-circle"></div> <div class="sk-circle8 sk-circle"></div> <div class="sk-circle9 sk-circle"></div> <div class="sk-circle10 sk-circle"></div> <div class="sk-circle11 sk-circle"></div> <div class="sk-circle12 sk-circle"></div> </div> <div class="text-center"><img class="w-25" src="images/visa-logo.png"/></div> </div> </div> </div> </div> </div> </div> <!--Cardholder information --> <div class="card" id="cardholderInfoCard"> |
checkout.html to find the following code inside the checkout() function.
1 2 3 4 5 6 7 8 9 10 11 12 13 | //checkout.html function checkout() { .... //remove cardholder information class, checkout button and show spinner effect $("#checkoutButton").remove(); $("#cardholderInfoCard").remove(); $("#checkoutCard").removeClass("d-none"); threeDSAuth(transId, cardHolderInfo, purchaseInfo); } |
1 2 3 4 5 6 7 8 9 10 11 12 | //checkout.html function checkout() { .... //remove cardholder information class, checkout button and show spinner effect $("#checkoutButton").remove(); //$("#cardholderInfoCard").remove(); //$("#checkoutCard").removeClass("d-none"); threeDSAuth(transId, cardHolderInfo, purchaseInfo); } |
Add line 11 to show the modal box for the popup challenge window instead.
1 2 3 4 5 6 7 8 9 10 11 12 13 14 | //checkout.html function checkout() { .... //remove cardholder information class, checkout button and show spinner effect $("#checkoutButton").remove(); //$("#cardholderInfoCard").remove(); //$("#checkoutCard").removeClass("d-none"); $('#authBox').modal(); threeDSAuth(transId, cardHolderInfo, purchaseInfo); } |
Sample project default configuration
The following values are default values that are set in the final demo code. You may refer to this section during the step-by-step tutorial.
- THREE_DS_SERVER_URL=https://api.as.testlab.3dsecure.cloud:7443
- THREE_DS_REQUESTOR_URL=http://localhost:8082
- KEYSTORE_PASSWORD=123456
Note
Support
If you have any questions after reading this documentation, we are here to help. Please email us at techsupport@gpayments.com.