Front-end implementation (v1)
In this section, we will show the integration implementation for the front-end of the merchant application using our sample code based on the Auth API version 1.
Important
GPayments strongly recommends all new implementations of ActiveServer to integrate with version 2 of the Auth API from the beginning, as version 1 will be deprecated in a future release. Refer to the API migration from v1 to v2 guide for a summary of the changes and migration process from v1 to v2. To check the new API v2 implementation, refer here.
The following files in the sample code package are essential for 3DS2 authentication in the front-end. Check the directory tree for details if required.
v1/process.html: Implements all the authentication sequences.v1/3ds-web-adapter.js: The core component of the 3DS Client that passes 3DS2 data from the front-end to the back-end and establishes the required iframes for callback URLs.notify_3ds_events.html: Call back page used for ActiveServer to trigger the next step in authentication (Step. 7 and Step. 18(C)). This page delivers authentication events to the checkout process.
The following sections detail the front-end implementation based on the authentication processes and authentication sequence.
Process 1: Initialise the Authentication
To initialise an authentication, the front-end needs to:
- Send an
Initialise authenticationmessage to the 3DS Requestor (Step. 1 and Step. 2). - Receive the response message and setup a callback
iframe(Step. 5 and Step. 6).
When a user clicks the "Checkout (v1)" button in the checkout page, the browser stores the necessary data to session storage and goes to the process.html page.
1 2 3 4 5 6 7 8 9 10 11 12 13 14 15 16 17 18 19 20 21 22 23 24 25 | //checkout.html function checkout() { var apiVersion = getApiVersion(); switch (apiVersion) { case "v1": goApiV1(); break; ... } } function goApiV1() { var sessionData = genSessionData(); sessionData.messageCategory = "pa"; sessionStorage.setItem("sessionData", JSON.stringify(sessionData)); window.location.href = "/v1/process"; } function genSessionData() { var sessionData = {}; sessionData.channel = "brw"; sessionData.authData = genAuthData(); sessionData.backButtonType = "toShop"; return sessionData; } |
Note
The sessionData contains:
channel:brwor3ri. Here we used thebrwchannel for a browser-based authentication.messageCategory: eitherpa- payment authentication ornpa- non-payment authentication. Here we usepaas an example.authData: all the necessary data in JSON format. For the data structure, refer to the API document.backButtonType: indicates thebackbutton type in the process page. Here we make thebackbutton asBack to shop.
NOTE: The use of sessionStorage for inter-page communications is just for demo purposes. The actual implementation of 3DS Requestor should choose the best approach for transferring parameters between pages for the integration with the existing checkout process.
In the process.html page, it receives the sessionData and starts the 3DS2 processes. Firstly, it sends information for initialising an authentication to the 3ds-web-adapter (Step. 1).
1 2 3 4 5 6 7 8 9 10 | //process.html var sessionData = JSON.parse(sessionStorage.getItem("sessionData")); ... switch (sessionData.channel) { case "brw": var container = $('#iframeDiv'); brw(sessionData.authData, container, _callbackFn, sessionData.messageCategory, sessionData.options, sessionData.transType); break; ... |
Note
The brw() function in 3ds-web-adapter takes the following parameters:
authData: all the necessary data in JSON format. For data structure, refer to the API document.container: pre-defined container for the 3ds-web-adapter to generateiframes.callbackFn: call back function to deal with the authentication results.messageCategory: eitherpa- payment authentication ornpa- non-payment authentication.options: optional parameters for 3DS Requestor. For example, the 3DS Requestor can choose to cancel the challenge by settingoptions.cancelChallenge=true.transType: parameter to select DS Profile.transType=prodto use production directory server, otherwise use TestLab directory server.
Next, in the 3ds-web-adapter, method brw() sends information to the 3DS Requestor back-end to initialise authentication (Step. 2).
1 2 3 4 5 6 7 8 9 10 11 12 13 14 15 16 17 18 19 20 21 22 23 24 25 26 27 28 29 30 31 32 33 | //3ds-web-adapter.js function brw(authData, container, callbackFn, messageCategory, options, transType) { _callbackFn = callbackFn; iframeContainer = container; if (options) { _options = options; } //generate an random number for iframe Id iframeId = String(Math.floor(100000 + Math.random() * 900000)); //3DS Requestor url for Initialise Authentication var initAuthUrl; if (messageCategory) { if (messageCategory === "pa" || messageCategory === "npa") { initAuthUrl = "/v1/auth/init/" + messageCategory; } else { _onError({"Error": "Invalid messageCategory"}); } } else { initAuthUrl = "/v1/auth/init/" + "pa"; } //add trans-type=prod to use production directory server if (transType === "prod") { initAuthUrl = initAuthUrl + "?trans-type=prod"; } console.log('init authentication', authData); //Send data to /auth/init/{messageCategory} to do Initialise authentication (Step 2) doPost(initAuthUrl, authData, _onInitAuthSuccess, _onError); } |
The brw() function makes a POST request to the back-end with the initAuth API message. The object is posted in JSON format. To check how the back-end handles this request, refer here.
The 3ds-web-adapter uses the _onInitAuthSuccess() function to handle the successful response (Step. 5).
1 2 3 4 5 6 7 8 9 10 11 12 13 14 15 16 17 18 19 20 21 22 23 | //3ds-web-adapter.js function _onInitAuthSuccess(data) { console.log('init auth returns:', data); if (data.threeDSServerCallbackUrl) { serverTransId = data.threeDSServerTransID; $('<iframe id="' + "3ds_" + iframeId + '" width="0" height="0" style="visibility: hidden;" src="' + data.threeDSServerCallbackUrl + '"></iframe>') .appendTo(iframeContainer); if (data.monUrl) { // optionally append the monitoring iframe $('<iframe id="' + "mon_" + iframeId + '" width="0" height="0" style="visibility: hidden;" src="' + data.monUrl + '"></iframe>') .appendTo(iframeContainer); } } else { _onError(data); } } |
The 3ds-web-adapter inserts two hidden iframes into the checkout page (Step. 6). The first one is for (Step. 7) so that the browser information can be collected by the ACS and ActiveServer using the threeDSServerCallbackUrl.
The second one is an optional monitoring iframe to guarantee that an InitAuthTimedOut event will be returned by ActiveServer when any errors occur during browser info collecting or 3DS Method processing. This event has a timeout of 15 seconds.
Process 2: Execute Authentication
To execute authentication, the front-end needs to first finish the browser information collection and (if available), 3DS Method data collecting. After these 2 processes are done, notify_3ds_event.html will notify the 3ds-web-adapter to continue with the authentication. In this process, if for any reason that the data collecting failed or was not able to finish, the separate monitoring iframe (setup in the InitAuth process) will notify the 3ds-web-adapter with an event InitAuthTimedOut, and then the authentication process will be terminated.
The following are the steps to execute the authentication:
- Implement or re-use the provided
notify_3ds_events.htmlto receive events about data collecting. - Send an
Execute authenticationmessage to the 3DS Requestor (Step. 8 and Step. 9) once events_on3DSMethodSkippedor_on3DSMethodFinishedare notified. - Handle the authentication result with frictionless flow or challenge flow (Step. 13, Step. 14(F) or Step. 14(C)).
The notify_3ds_events.html is used to trigger the authentication process (Step. 8). The 3DS Requestor will render notify_3ds_events.html with the variables transId, callbackName and an optional param. To check the back-end implementation, refer here.
1 2 3 4 5 6 7 8 9 10 11 12 13 14 15 16 17 18 19 20 21 22 23 24 25 26 27 28 29 30 | <!--notify_3ds_events.html--> <!DOCTYPE html> <html lang="en"> <head> <meta charset="UTF-8"/> <title>3DSecure 2.0 Authentication</title> </head> <body> <form> <input type="hidden" id="notifyCallback" name="notifyCallback" value={{callbackName}}> <input type="hidden" id="transId" name="transId" value={{transId}}> <input type="hidden" id="param" name="param" value={{callbackParam}}> </form> <script src="https://code.jquery.com/jquery-3.3.1.min.js" integrity="sha256-FgpCb/KJQlLNfOu91ta32o/NMZxltwRo8QtmkMRdAu8=" crossorigin="anonymous"></script> <script> //notify parent check out page to proceed with rest procedures. var callbackFn = parent[$('#notifyCallback').val()]; //callbackFn is defined in 3ds-notify handler method if (typeof callbackFn === 'function') { callbackFn($('#transId').val(), $('#param').val()); } </script> </body> </html> |
You can see that depending on the callbackName, it will call different methods in the 3ds-web-adapter (Step. 8). The value of callbackName should be _onThreeDSMethodFinished, _onThreeDSMethodSkipped, _onAuthResult or _onInitAuthTimedOut. For example, the _onInitAuthTimedOut event can be used when the 3DS Method is timed out.
An explanation of each method is below:
| Event | Description |
|---|---|
_onThreeDSMethodFinished | Notifies that the 3DS method is finished by ACS and it's time to call _doAuth() |
_onThreeDSMethodSkipped | Notifies that the 3DS method has been skipped (Not available or other reasons) and it's time to call _doAuth(),Note regardless of 3DS Method is skipped or not, the 3DS Server browser information collecting is always performed prior to 3DS Method. |
_onAuthResult | This event notifies that the authentication result is available to fetch. Used in frictionless and challenge flow (Step. 17(F) & 19(C)). |
_onInitAuthTimedOut | Notifies that errors occurred during 3DS Method or browser info collecting. In this demo, the error message will be logged out and the authentication process will continue. Check _onInitAuthTimedOut() function in 3ds-web-adapter.js for details. |
Here, at Step. 8 in our demonstration, the callbackName returned by ActiveServer will be either _onThreeDSMethodFinished or _onThreeDSMethodSkipped.
The 3ds-web-adapter will call _doAuth() to make a POST request to execute authentication (Step. 9) once these events are received.
The backend then makes a call to the auth endpoint. To check how the back-end handles the request, refer here.
1 2 3 4 5 6 7 8 9 10 11 12 13 | //3ds-web-adapter.js function _doAuth(transId) { console.log('Do Authentication for transId', transId); //first remove any 3dsmethod iframe $("#3ds_" + iframeId).remove(); var authData = {}; authData.threeDSRequestorTransID = transId; authData.threeDSServerTransID = serverTransId; doPost("/v1/auth", authData, _onDoAuthSuccess, _onError); } |
The 3ds-web-adapter uses _onDoAuthSuccess() function to handle the successful response (Step. 13).
1 2 3 4 5 6 7 8 9 10 11 12 13 14 15 16 17 18 19 20 21 22 23 24 25 26 27 28 29 30 | //3ds-web-adapter.js function _onDoAuthSuccess(data) { console.log('auth returns:', data); if (data.transStatus) { if (data.transStatus === "C") { // 3D requestor can decide whether to proceed the challenge here if (_options.cancelChallenge) { if (_options.cancelReason) { var sendData = {}; sendData.threeDSServerTransID = serverTransId; sendData.status = _options.cancelReason; doPost("/v1/auth/challenge/status", sendData, _onCancelSuccess, _onCancelError) } else { var returnData = _cancelMessage(); _callbackFn("onAuthResult", returnData); } } else { data.challengeUrl ? startChallenge(data.challengeUrl) : _onError( {"Error": "Invalid Challenge Callback Url"}); } } else { _callbackFn("onAuthResult", data); } } else { _onError(data); } } |
It performs different flows based on the returned transStatus.
Note
The transStatus can be Y, C, N, U, A, and R
Y: Authentication/Account Verification SuccessfulC: Challenge/Additional authentication is requiredN: Not Authenticated/Account Not VerifiedU: Authentication/Account Verification Could Not Be PerformedA: Attempts Processing PerformedR: Authentication/Account Verification Rejected
For more information related to transStatus, refer to the API document.
Frictionless authentication result
If the transStatus is not C (i.e. frictionless), the 3ds-web-adapter will go to the frictionless flow (Step. 14(F)) and show the results using the _callbackFn("onAuthResult", data) (line 11).
1 2 3 4 5 6 7 8 9 | //process.html function _callbackFn(type, data) { switch (type) { case "onAuthResult": //display "Show results in separate page" $("#sepButton").removeClass("d-none"); showResult(data); break; |
The showResult(data) function will display the results in the process.html page:

The frictionless authentication process stops at this point. The merchant checkout process can now move to the authorisation process as normal using the authentication result information.
Info
The authentication result can also be shown in a separate page. This is covered in process 3.
Continue challenge process
If the transStatus is C, a challenge is required from the ACS. It is up to the 3DS Requestor to decide whether it wants to continue the 3DS2 authentication and proceed to the challenge process or terminate the authentication process if a challenge is not desired. In this demo, the options.cancelChallenge parameter is used to indicate the 3DS Requestors decision on the challenge flow. This feature is outlined on the BRW Test Page.
Note
For demo purposes, the cancel challenge process is implemented in the front end javascript (3ds-web-adapter). For security reasons this process may need to be implemented in the back end on the production environment.
The 3ds-web-adapter will check the options.cancelChallenge parameter. If options.cancelChallenge=true, the 3ds-web-adapter will cancel the challenge. Optionally, options.cancelReason can also be set and sent to ActiveServer depending on the specified Cancel Reason. The specified reason will be sent by the 3ds-web-adapter to the challengeStatus endpoint in the back-end. To check how the back-end handles this request, refer here.
The cancel challenge results screen should look similar to the screenshot below:

If options.cancelChallenge=true is not present (or the value is set to false), the 3ds-web-adapter will call startChallenge(), which inserts an iframe for the challenge window with src set to challengeUrl (Step. 14(C)) in order to show the challenge screen to the card holder.
1 2 3 4 5 6 7 8 9 10 11 | //3ds-web-adapter.js function startChallenge(url) { _callbackFn("onChallengeStart"); //create the iframe $('<iframe src="' + url + '" width="100%" height="100%" style="border:0" id="' + "cha_" + iframeId + '"></iframe>') .appendTo(iframeContainer); } |
Note
If you want to test the challenge scenario, follow the guide here.
You can see that the iframe class has been set to width="100%" and height="100%". This is required because the iframe needs to resize according to the content provided by the ACS. The challenge screen should look similar to the screenshot below:

The cardholder can now input the authentication data such as an OTP password and submit the challenge form. The ACS will authenticate the transaction and the card holder and return the challenge result.
After the challenge flow is finished, ActiveServer will call the 3ds-notify entry point in the 3DS Requestor backend with event _onAuthResult and then the 3DS Requestor will render the notify_3ds_events.html page, similar to before (Step. 19(C)). The 3ds-web-adapter calls the _onAuthResult() function to get the authentication results and displays them on the process.html page.
Info
In a production environment the ACS will perform complex risk-based authentication from the information obtained about the cardholder. Similarly, the authentication method (e.g. OTP, biometrics etc) will be determined and implemented by the cardholder's issuing bank.
Process 3: Get Authentication Result
After the challenge process is finished (or if the frictionless process results need to be shown in a separate page), we now need to request for the authentication result so that it can be used for the authorisation process.
Why a separate result request is necessary?
You may wonder why you need to request the result again since you already have the result of authentication available after process 2.
This is because the authentication result is returned to the authentication page in Step. 13 by the 3DS Requestor. It is common that the authentication result page is shown as a separate page from the checkout page. In this case, the 3ds-web-adapter could transfer the result back to the 3DS Requestor or the result page, however, it is not a recommended data flow as the authentication result is re-transferred by the client side code and is in general considered as insecure.
The server-side of the 3DS Requestor should always have its own mechanism to get the result back from the origin source: ActiveServer. Instead of transferring the result to the new result page, the 3DS Requestor server-side can provide a result page that shows the authentication result. Therefore, you need to request for a result receipt in this step.
Here in this demo, you can select Show results in separate page >> at the end of process 2 in the process.html page to show the result in a separate page.
To get the authentication result and show it in a separate page, the front-end needs to:
- Send a
Request for authentication resultmessage to the 3DS Requestor (Step. 15(F) or Step. 20(C)). - Show result on screen (Step. 17(F) or Step. 22(C)).
Firstly, in the process.html page, it will store the serverTransId into sessionStorage and go to result.html page.
1 2 3 4 5 6 7 8 9 | //process.html function openResultInNewWindow() { if (serverTransId) { var url = '/v1/result'; sessionStorage.setItem("serverTransId", serverTransId); window.open(url, 'newwindow', 'height=800,width=1000'); } } |
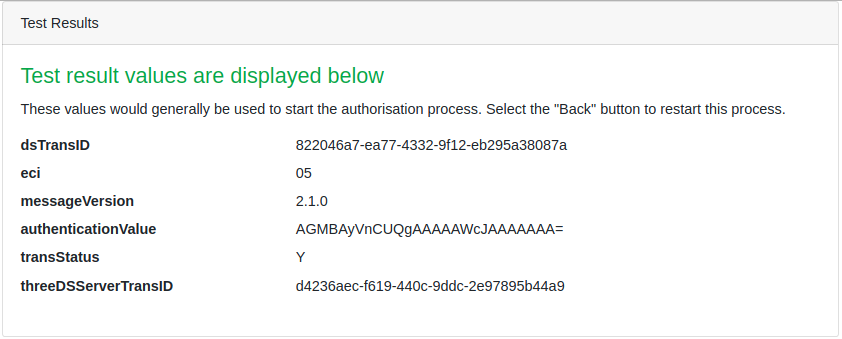
In the v1/result.html page, it call the result() method in 3ds-web-adapter to get the authentication result. The result() method sends a Request for authentication result message to the backend. The backend will receive this request and call the result endpoint. To check how the back-end handles this request, refer here. The callback function showData() shows the results in the page.
1 2 3 4 5 6 7 8 9 10 11 12 13 14 15 16 17 | //result.html var serverTransId = sessionStorage.getItem("serverTransId"); //request for authentication result (Step 15(F) or Step 20(C)) result(serverTransId, showData); //show result in separate page (Step 17(F) or Step 22(C)) function showData(type, data) { var toShow = "<dl class='row'>"; Object.keys(data).forEach(function (k) { toShow = toShow + "<dt class='col-sm-4'>" + k + "</dt>" + "<dd class='col-sm-8'>" + data[k] + "</dd>"; }); toShow += "</dl>"; $('#showResult').empty().append(toShow); $("#resultCard").removeClass("d-none"); } |
The new result screen will look like the screenshot below:
Success
This covers the front-end integration. After authentication is completed the checkout process can proceed with the authorisation process using the Transaction Status, ECI and CAVV to complete the transaction.
Whats next?
Select Next to learn about the v1 Back-end implementation for a 3DS Requestor.