Quickstart
Quickstart is intended to guide you smoothly through downloading, setting up, and running ActiveServer. For specific user guides on how to configure and manage ActiveServer, refer to the Guides section, two menu items below this one.
Prerequisites
Specifications:
| Specifications | Details |
|---|---|
| Operating System | Linux, Windows Server |
| Memory | 2 GB RAM (recommended) |
| Disk Space | No minimum requirements, but ensure that sufficient disk space is available for the database, as all data is stored in the database. |
| Java Development Kit | Java SE Development Kit 8 (Open JDK v1.8) |
| Java Container | The .jar file can run in any container that supports Servlet 2.4/JSP 2.0 or later. Default container is UnderTow. |
| Web Browser | The Administration UI can be accessed using Google Chrome, Mozilla Firefox, or Microsoft Edge. |
Database:
| Database | Compatible Versions |
|---|---|
| MySQL / Amazon Aurora MySQL | 5.7 |
| Oracle | 11g, 12c |
| Microsoft SQL Server | 2008 R2, 2012, 2014, 2016, 2017 |
| PostgreSQL | 8.4 and later |
| IBM Db2 | 11.1 and later |
Download ActiveServer
Login to GPayments MyAccount at https://login.gpayments.com/login.
If you do not have an account...
If you do not have a GPayments MyAccount, register at: https://login.gpayments.com/register
Once logged in, you will see the MyAccount Dashboard.

From the Navigation Menu on the left, select ActiveServer > Download.
Select the release package to start the download.
MyAccount organisations
MyAccount utilises an organisation structure for clients to share product privileges between company users, such as downloading the software, and managing instance activation and licensing.
When downloading the software, if you are not part of an organisation yet, you will be prompted to either Register an organisation, or ask your point of contact with GPayments to invite you to your existing organisation. Inviting a user to an organisation can be done from the MyAccount > Profile Settings > My Organisation section.
Important
To access your purchased software and manage existing instances for your organisation, confirm your company does not already have an organisation setup before creating a new one.
Once part of an organisation that has already purchased ActiveServer, you should be able to download the package. If you are unable to download the software, but have confirmed you are in the correct organisation that has already purchased the product, please contact GPayments Tech Support at techsupport@gpayments.com for assistance. Or, if you would like to talk to our friendly sales team about purchasing ActiveServer, you can contact GPayments Sales at sales@gpayments.com.
Installation
Extract the downloaded .zip file, and you should see the files below.
1 2 3 4 5 6 7 | ActiveServer_vX.XX/ ├── application-prod.properties ├── as.jar ├── README.txt ├── release.txt ├── startup.bat └── startup.sh |
The files are:
application-prod.properties- Configuration file to initialize ActiveServer.as.jar- The main ActiveServer Java package.README.txt- General information about ActiveServer, as well as its documentation, licensing, and support.release.txt- Release notes for all versions of ActiveServer.startup.bat- The startup script for Windows.startup.sh- The startup script for Linux.
Configuration
Configure the system properties for ActiveServer by editing the application-prod.properties file.
You can startup ActiveServer without configuring system properties, but...
The application-prod.properties file in the package you have downloaded includes default application properties. If you start up an instance of ActiveServer using these default application properties, ActiveServer will:
- Use a default database that will only be temporarily stored in the RAM, and will be wiped once the ActiveServer instance is shut down.
- Create a keystore file with SunJCE that is stored locally in
${AS_HOME}/conf/security/. - Skip email server configurations, therefore disabling the system from sending email notifications to users.
Using the default properties may be useful for trying out the software and its interface as it allows you to quickly startup an instance of ActiveServer without having to change any settings. However, you must configure the system properties before setting up a production instance.
To change the default application properties:
Open the file application-prod.properties and change the corresponding values associated with each relevant parameter.
There are 4 categories of system properties:
Database settings
ActiveServer supports the following databases:
Each database has the following set of configurable properties:
as.db.vendor=
Database vendor/type. Default value is empty, where an in-memory test database will be used. You cannot enter production with the in-memory test database. Possible values aremysql,oracleorsqlserver.as.db.url=
The database connection URL used to connect to your database. The URL must be in JDBC format.as.db.username=
Database username. Enter the username set by your database administrator.as.db.password=
Password. Enter the password set by your database administrator.as.db.password-plain=
Whether to encrypt the password above or not. ActiveServer can encrypt the password when storing it in theapplication-prod.propertiesfile. To enable password encryption, enterfalse. To leave the password as plain text, entertrue.
MySQL / Amazon Aurora MySQL
To use a MySQL or Amazon Aurora MySQL database, you will need the following properties:
1 2 3 4 5 | as.db.vendor=mysql as.db.url=jdbc:mysql://<Your My SQL DB Host>:3306/<Your DB Name>?useUnicode=true&characterEncoding=utf8&useSSL=false as.db.username=<user name> as.db.password=<password> as.db.password-plain=true |
Oracle
To use a Oracle database, you will need the following properties:
1 2 3 4 5 | as.db.vendor=oracle as.db.url=jdbc:oracle:thin:@//<Your Oracle DB Host>:1521/<Your Oracle DB Name> as.db.username=<user name> as.db.password=<password> as.db.password-plain=true |
Microsoft SQL Server
To use a Microsoft SQL Server database, you will need the following properties:
1 2 3 4 5 | as.db.vendor=sqlserver as.db.url=jdbc:sqlserver://<Your MSSQL DB Host>:<Your Port Name>;databaseName=<Your DB Name> or jdbc:sqlserver://<Your MSSQL DB Host>\<Your Instance Name>;databaseName=<Your DB Name> as.db.username=<user name> as.db.password=<password> as.db.password-plain=true |
PostgreSQL
To use a PostgreSQL database, you will need the following properties:
1 2 3 4 5 | as.db.vendor=postgresql as.db.url=jdbc:postgresql://<Your PostgreSQL DB Host>:5432/<Your DB name> as.db.username=<user name> as.db.password=<password> as.db.password-plain=true |
IBM Db2
To use an IBM Db2 database, you will need the following properties:
1 2 3 4 5 | as.db.vendor=db2 as.db.url=jdbc:db2://<Your DB2 host>:50000/<Your DB name> as.db.username=<user name> as.db.password=<password> as.db.password-plain=true |
Web server settings
Web server settings allows you to configure the default server ports, as well as other networking related variables. Depending on your network setup, you can choose to use HTTP or HTTPS. With HTTP, the entry point must be accessible from the Internet, and so a load-balancer or reverse proxy may be required to handle HTTPS traffic as well as SSL termination.
By default, the server port serves all web page requests including authentication callback pages and admin UI interface requests.
1 2 3 4 5 6 7 8 9 10 11 | ## Server port, protocol and SSL settings ## protocol http|https|both as.server.protocol=http as.server.http.port=8080 as.server.https.port=8443 as.server.https.key-store=<Your keystore file path> ## keystore type, can be pkcs12 or jks as.server.https.key-store-type=pkcs12 as.server.https.key-store-password=<Your keystore password> ## Set to false to disable this listening port # as.server.enabled=false |
as.server.https.key-store=
Keystore file path. A keystore is required for HTTPS. The keystore should contain server certificates for the specified HTTPS listening port. Note that for a production instance, the server certificate must be commercially signed by a CA.as.server.https.key-store-type=
Keystore type. ActiveServer supports two different keystore types. Possible values arepkcs12orjks. Commercially signed certificates issued by a CA are typically in "pkcs12" format with a file extension of.p12or.pfx.as.server.enabled=
Enable or disable the server listening port. To enable the server listening port, entertrue. To disable server listening port, enterfalse.
Warning
HTTP is not recommended to access the web pages served by the server port. The HTTP setting for as.server.protocol should only be used for SSL termination in a production environment where a front-end load balancer handles TLS/SSL traffic and forwards the request to the back-end AS instance via HTTP.
Depending on your network configuration, you may want to setup administration access via a separate port. To do so, the following settings must be applied. By default, the Admin port number is disabled. If enabled, port numbers set below must not conflict with any other port numbers.
Enabling this setting will restrict all administration UI interface traffic to the specified port. The server port will then serve the authentication callback pages only.
1 2 3 4 5 6 7 8 9 10 11 12 | #Admin port , protocol and ssl config #By default, Admin port configuration shares with Server port configuration #Set following setting to true to enable this listening port as.admin.enabled=false as.admin.http.port=9090 as.admin.https.port=9443 #protocol http|https|both as.admin.protocol=http as.admin.https.key-store=<Your keystore file path> #keystore type, can be pkcs12 or jks as.admin.https.key-store-type=pkcs12 as.admin.https.key-store-password=<Your keystore password> |
Warning
HTTP is not recommended to access your administration UI. The HTTP setting for as.admin.protocol should only be used for SSL termination in a production environment where a front-end load balancer handles TLS/SSL traffic and forwards the request to the back-end AS instance via HTTP.
Authentication and Admin API port. Only available in HTTPS with mutual authentication. This port will be enabled once the ActiveServer instance is activated. A server restart is required to enable this port.
1 2 | #Auth api port, only https port is configurable as.api.port=7443 |
The following Directory Server listening port settings are for ActiveServer to send and receive requests with the Directory Server in mutual authentication. These connectors are always HTTPS enabled. Server and client certificates for Directory Servers can be configured later on, as described in Manage DS certificates.
Note
Once you complete the certificate settings on the Administrator UI, a server restart is required.
Each Directory Server has the following set of configurable properties:
as.<Card Scheme>.port=These are the port numbers for each card scheme for listening on their Directory Servers. Default values can be found below.
Note
The port number must not conflict with any other port numbers.
# as.<Card Scheme>.enabled=falseThis parameter is commented out by default. Determines the status of the Directory Server listening port, disabled or enabled.
To disable the Directory Server listening port, enterfalse, otherwise, leave it commented out.
American Express
1 2 3 | as.amex.port=9600 ## Set to false to disable DS HTTPS listening port # as.amex.enabled=false |
China UnionPay
1 2 3 | as.chinaunionpay.port=9601 ## Set to false to disable DS HTTPS listening port # as.chinaunionpay.enabled=false |
Support for China UnionPay will be added in a future release.
Discover / Diners Club International
1 2 3 | as.discover.port=9602 ## Set to false to disable DS HTTPS listening port # as.discover.enabled=false |
JCB
1 2 3 | as.jcb.port=9603 ## Set to false to disable DS HTTPS listening port # as.jcb.enabled=false |
Mastercard
1 2 3 | as.mastercard.port=9604 ## Set to false to disable DS HTTPS listening port # as.mastercard.enabled=false |
Visa
1 2 3 | as.visa.port=9605 ## Set to false to disable DS HTTPS listening port # as.visa.enabled=false |
Keystore settings
ActiveServer provides 3 options for storing encryption keys:
Use the following property to set the keystore type:
1 | as.keystore.type=<keystore type> |
as.keystore.type=
Keystore type - possible values arelocal,s3,pkcs11,kms.
Local keystore (SunJCE)
To use a local keystore file, use the following property:
1 | as.keystore.local.path=${AS_HOME}/security/keystores/ |
as.keystore.local.path=
Keystore file path. Enter the file path to your keystore file, which should point to the folder that contains the keystore files.
Warning
If using a Windows based machine, note that an escape character (\) is probably required when setting the full path to the keystore folder.
E.g. if a Windows share folder is being used with the path \\ActiveServer\keystores, the keystore path would be set as as.keystore.local.path=\\\\ActiveServer\\keystores.
Amazon S3 keystore
ActiveServer supports using Amazon S3 as the keystore. To utilize an Amazon S3 keystore, you need to set the AWS Bucket, AWS Region, and AWS Credentials settings.
AWS Bucket
Please create an empty S3 bucket by following the AWS guide.
Set your AWS Bucket path in the following properties:
1
as.keystore.s3.bucket-name=<Your S3 Bucket Name>
If only the bucket name is provided e.g.
as.keystore.s3.bucket-name=as-example-bucket, required keystores will be created by ActiveServer in the root directory. If a path is added to the bucket name, it will create the directory with given name inside the bucket. For example,as.keystore.s3.bucket-name=as-test-bucket/keystoreswill create all the required keystores underkeystoresdirectory inside the bucketas-example-bucket.
AWS Region
The AWS Region can be set in several ways. A list of region codes can be found in the Region column of this table: Amazon AWS - Regions and Availability Zones.
Set the AWS Region code in the following properties:
1
as.keystore.s3.region=<Your S3 Region Name>
Or, set the AWS Region in the AWS config file on your local system. The config file should be located at:
~/.aws/configon Linux, macOS, or Unix, orC:\Users\USERNAME\.aws\configon Windows. This file should contain lines in the following format:1 2
[default] region = <Your S3 Region Name>
Access permissions
Make sure you have configured the credentials with Read and Write permission to the bucket. For more information about configuring the credentials refer below.
AWS Key Management Service (KMS)
Configuration
Create a symmetric Customer Managed Key (CMK) in KMS by following the guide provided by AWS.
Copy and paste the key ARN from the AWS KMS dashboard to the properties file:
1
as.keystore.kms.key-arn=<Your AWS Key ARN> e.g. arn:aws:kms:us-east-1:123456789012:key/19c7b3dc-c49d-401f-bb97-f10bf3e116c9
Access permissions
Make sure you have configured the credentials with Read and Write permission to the bucket. For more information about configuring the credentials refer below.
Warning
Note that only Auth API v2 is supported when using AWS KMS. Auth API v1 transactions will be result in error code 1027.
PKCS11 HSM
ActiveServer supports using a HSM as the keystore. The HSM must support the PKCS11 API. To use hardware encryption with a PKCS11 HSM, you will need the following properties:
1 2 | as.keystore.pkcs11.library=<the library to the pkcs11 driver> as.keystore.pkcs11.slot=<the slot number> |
as.keystore.pkcs11.library=
HSM driver library. For Linux, this is typically a.sofile. For Windows, this is typically a.dllfile. Consult your HSM's documentation for details on the library that should be use.as.keystore.pkcs11.slot=
The slot number on your HSM. Consult your HSM's documentation for details on the slot number that should be use.
Info
Note that setting up and configuring an HSM is out of scope for this document. Please ensure your HSM is fully functional before configuring with ActiveServer.
HSM Token Login is required
When using a HSM for key management, AS requires the HSM to enable "Always require Token Login". This setting is usually set as on automatically for most HSMs, however for HSMs like Safenet, this setting may not be on by default. Please refer to your HSM documentation for instructions.
For SafeNet HSMs, this can be done by setting the No Public Crypto security flag. Administrators can use the provided command line utility ctconf to set the flag.
AWS Credentials
If as.keystore.type=s3 or as.keystore.type=kms is used, the AWS credentials needs to be configured so that ActiveServer can access the AWS services. AWS Credentials include an access_key_id and a secret_access_key. AWS Credentials can be set in a number of ways:
Set your AWS Credentials in the following properties if you want to use different credentials for the S3 bucket:
1
2
as.keystore.s3.credentials.access-key-id=<Your Amazon S3 access key ID> as.keystore.s3.credentials.secret-access-key=<Your Amazon S3 secret access key>
Warning
This is no longer recommended but these properties are maintained for anyone using an ActiveServer version older than 1.3.0. It is strongly recommended to use the other credential options available.
Set your AWS credentials in the following properties:
1
2
as.aws.credentials.access-key-id=<Your AWS access key ID> as.aws.credentials.secret-access-key=<Your AWS secret access key>
Or, set the AWS Credentials in the AWS credentials profile file on your local system. The credentials profile file should be located at:
~/.aws/credentialson Linux, macOS, or Unix, orC:\Users\USERNAME\.aws\credentialson Windows. If using this method, the ActiveServer properties file can be left blank. This file should contain lines in the following format:1 2 3
[default] aws_access_key_id = <Your Amazon S3 access key ID> aws_secret_access_key = <Your Amazon S3 secret access key>
Or, if you deploy ActiveServer on an AWS EC2 instance, you can specify an IAM role and then give your EC2 instance access to that role. In this case, you need to follow the Amazon AWS - Using IAM Roles to Grant Access to AWS Resources on Amazon EC2 guide. If using this method, the ActiveServer properties file can be left blank.
Email server settings
ActiveSever allows you to send email notifications to users. Email notifications can be used to notify a user of their activation URL, remind users when a license is about to expire etc.
You will need an email account with its associated credentials and server details to setup email notifications.
1 2 3 4 5 6 | as.mail.host=<Your SMTP server host> as.mail.port=<Your SMTP server port> as.mail.user-name=<Email address> as.mail.password=<Email password> as.mail.auth=true as.mail.start-tls=true |
as.mail.host=
The SMTP domain of your email server.as.mail.port=
The port number of your email server.as.mail.user-name=
The email address of the account from which emails will be sent from.as.mail.password=
The password of the email account.as.mail.auth=
Whether the email account requires SMTP authentication. If the email account requires authentication, entertrue. Otherwise, enterfalse. If unsure, consult your email server administrator for details.as.mail.start-tls=
TLS required by the SMTP server or not. If SMTP server requires TLS, entertrue. Otherwise, enterfalse. If unsure, consult your email server administrator for details.
Info
Note that setting up and configuring email servers is out of scope for this document. Please ensure your email server is fully functional before configuring with ActiveServer.
Log settings
By default, ActiveServer will output all log files to the {AS_HOME}/logs/ folder, which will be created if it does not exist. If you would like to specify a different log folder location, uncomment and edit the following setting with the desired path:
1 | # as.logging.path=<Your log file path> |
If using a multi node setup for the instance, separate folders are required for each node due to the file naming conventions.
Warning
If this value is changed, note that any errors in setup may result in the log files not being recorded correctly. Ensure that the path is correct and that the ActiveServer instance can access and has read/write permissions for the specified path.
Setting TLS version
ActiveServer specifies HTTPS connectors to use TLS 1.2 only by default. However, due to a reported issue with Java 1.8, the TLS 1.0 and 1.1 protocols are also enabled. If you wish to disable protocols, a workaround is possible by editing the Java security file directly and is shown below.
Warning
Note that editing the java.security file will affect all Java applications on the server. GPayments cannot be held responsible for any issues that may result from this change.
To disable a specific protocol, edit the java.security file located at <jdk directory>/jre/lib/security and update the jdk.tls.disabledAlgorithms entry. The original entry might look like the below:
1 2 | jdk.tls.disabledAlgorithms=SSLv3, RC4, DES, MD5withRSA, DH keySize < 1024, \ EC keySize < 224, 3DES_EDE_CBC, anon, NULL |
To disable protocols considered weak and not included by default, such as SSLv2Hello, TLSv1, TLSv1.1, append those values to the entry like below:
1 2 | jdk.tls.disabledAlgorithms=SSLv3, RC4, DES, MD5withRSA, DH keySize < 1024, \ EC keySize < 224, 3DES_EDE_CBC, anon, NULL,SSLv2Hello, TLSv1, TLSv1.1 |
Important
The suggested protocols to disable are just suggestions, consult your security team when deciding your security configuration for ActiveServer.
After editing the java.security file, restart any running ActiveServer instances for the change to take effect. You can check what protocols are enabled by running the following command on a linux terminal:
1 | nmap --script +ssl-enum-ciphers -p 7443 127.0.0.1 |
Startup ActiveServer
Now that all properties are correctly configured, you can startup an instance of ActiveServer.
If you use Linux, open Terminal. If you use Windows, open Command Prompt.
Change your working directory to the folder that contains the startup scripts (.sh or .bat file).
Now you can startup ActiveServer with the following command.
1 | ./startup.sh |
1 | startup.bat |
Make sure the as.jar file is in the same directory as the startup scripts
The startup command will not work if the as.jar file is not in the same directory as the startup scripts.
You should now see the following output in Terminal or Command Prompt. Make sure to take note of the Administration URL, as it will be needed in the next step.
1 2 3 4 5 6 7 8 9 10 11 12 13 14 15 16 17 18 19 20 21 22 23 24 25 26 27 28 29 30 31 32 | ______________________________________________________________________________________ ActiveServer by GPayments _______ _____ _____ ________ ___ |_________ /____(_)___ _______ __ ___/_____ ___________ _______ ________ __ /| |_ ___/_ __/__ / __ | / /_ _ \_____ \ _ _ \__ ___/__ | / /_ _ \__ ___/ _ ___ |/ /__ / /_ _ / __ |/ / / __/____/ / / __/_ / __ |/ / / __/_ / /_/ |_|\___/ \__/ /_/ _____/ \___/ /____/ \___/ /_/ _____/ \___/ /_/ ______________________________________________________________________________________ . . . -------------------------------------------------------------------------------- ActiveServer by GPayments is up and running. Version: 1.0.0 Git Commit Id: da369ec Activation: NOT ACTIVATED, please contact GPayments Authentication API Port: 7443 Server: http://10.0.75.1:8081 Administration: http://10.0.75.1:8081 Key Store Type: SUNJCE Profile(s): [prod] ------------------------------------------------------------------------------- |
Startup script
In the startup scripts, the environment variable AS_HOME is set to the directory in which application-prod.properties is located. ActiveServer uses AS_HOME to find the configuration files as well as maintain keystores and output logs. By pointing AS_HOME to different locations, it is possible to run multiple ActiveServer instances on the same server. This can be done by copying the package to a different directory, or creating different startup scripts, and within those scripts, pointing AS_HOME to different directories.
Note
Where there are multiple instances on the same server, the port numbers must not conflict in any of the application-prod.properties files.
ActiveServer profile
In addition to setting AS_HOME, the startup script also sets the environment variable AS_PROFILES. This is a convenient mechanism to specify profile based configurations.
By default, the profile is set to prod.
ActiveServer uses the pattern application-<profile>.properties to load the profile's configuration file. Therefore under the default prod profile, application-prod.properties will be loaded. However, you can create new profiles (such as test) to setup different configurations for ActiveServer.
To create a new profile:
- Create a new configuration file named
application-test.propertiesand place it in the same directory as theprodconfiguration file. Open the startup scripts and set the value of
AS_PROFILEStotest.ActiveServer will load the new profile instead of the old
prodproperties.ActiveServer can also load multiple profiles at the same time, to do this set the value of
AS_PROFILEStoprod,testand ActiveServer will load properties files from bothprodandtestprofiles.With these options available, you can maintain settings separately under separate
.propertiesfiles.
Tip
If you maintain all database settings in application-db.properties, and web server settings in application-web.properties, by setting the value of AS_PROFILES to db,web, ActiveServer settings can be segregated for different administrators to manage.
Setup Wizard
Once ActiveServer is up and running, you can access the Administrator UI via the Administration URL.
If this is your first time running ActiveServer, the Setup Wizard will appear and guide you through the setup process.
The Setup Wizard involves the following steps:
- EULA agreement
- Keystore setup
- Administrator setup
- Administrator password setup
- System two-factor authentication setting
- System initialisation
EULA agreement

Read the EULA Agreement. If you agree to the terms and conditions, select the I accept the above agreement. checkbox to proceed.
Keystore setup
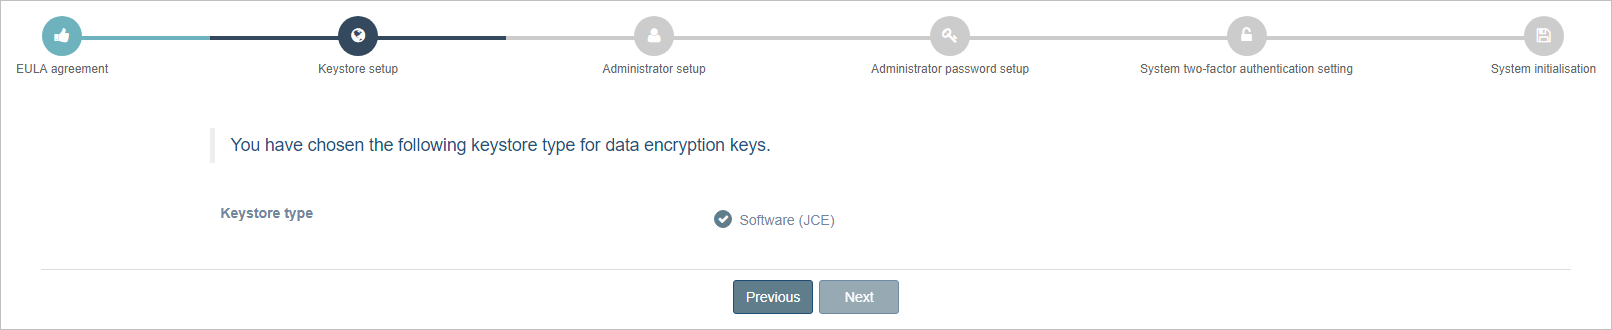
Select the Keystore type.
If Software was selected by during setup, SUNJCE will be utilised.
There is also the option to use a PKCS#11 HSM by entering the appropriate details in the
application-prod.propertiesfile. See the Encryption Module on how to setup a PKCS#11 HSM.Select the Next button to continue.
Administrator setup
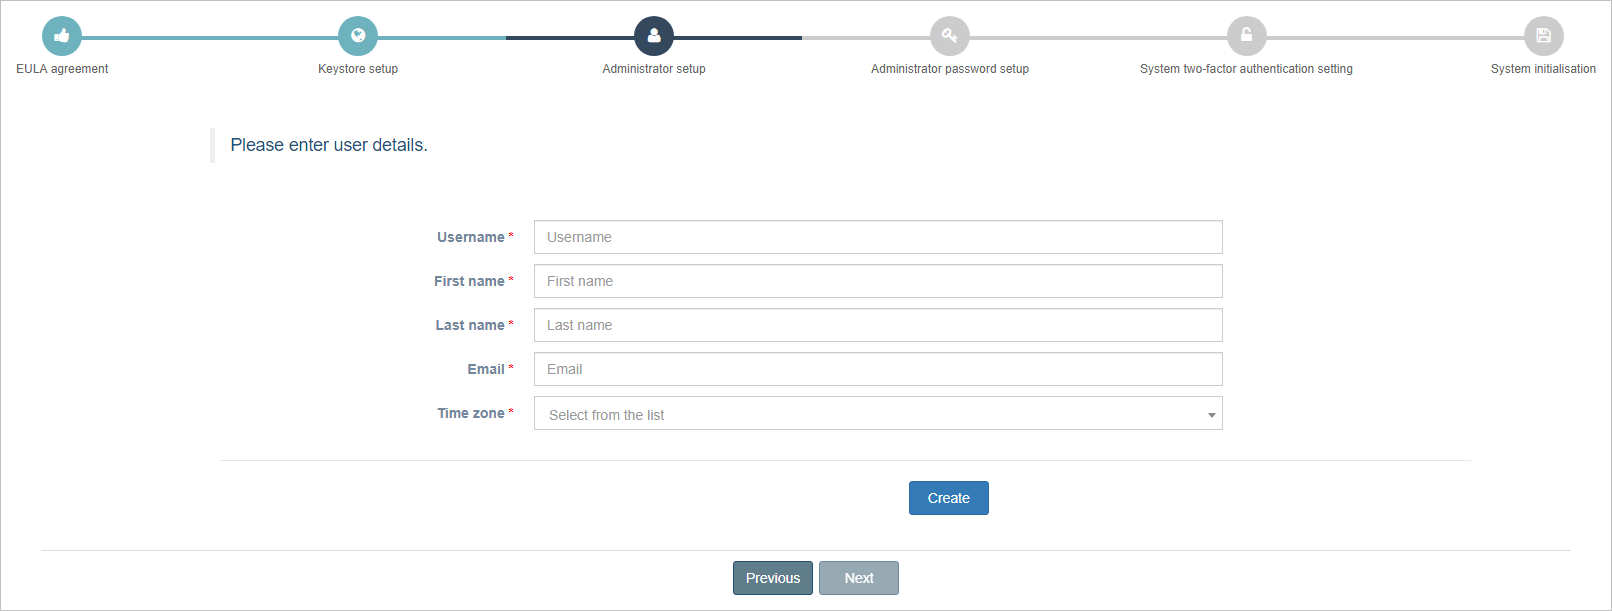
Enter the user details for your Administrator account.
Select the Create button to create the account.
Select the Next button to continue.
Administrator password setup
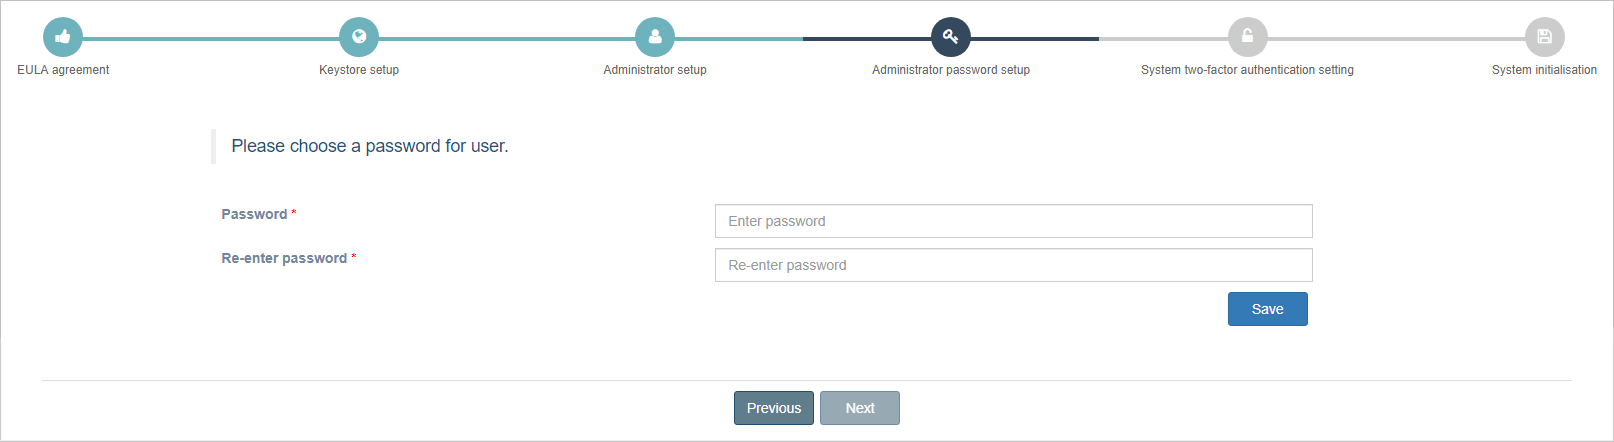
Enter a password for the Administrator account.
Re-enter the password to confirm it.
Select the Save button to create it.
Select the Next button to continue.
System two-factor authentication setting

ActiveServer supports two factor authentication for signing into the Administrator UI.
Note
To use this feature, you must have Google Authenticator installed on a mobile device.
Refer to Install Google Authenticator for setup instructions for Google Authenticator.
By default, ActiveServer does not force users to use two factor authentication.
To mandate two factor authentication for all users:
Enable the toggle, adjacent to Force 2FA for all users.
Select the Next button to continue.
System initialisation
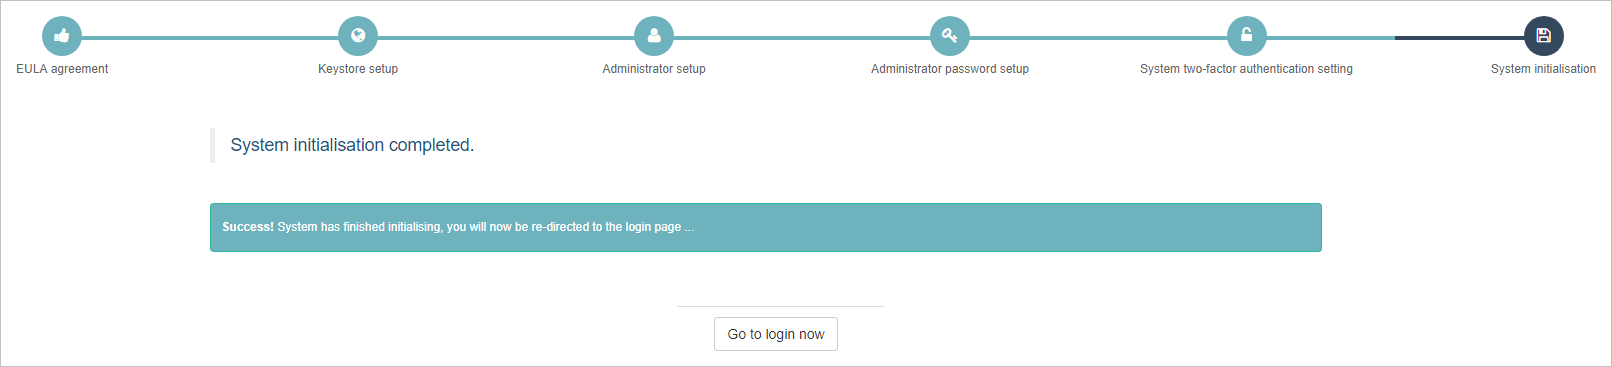
The Setup Wizard will inform you that system initialisation is complete and you will be redirected to the ActiveServer login page.

What next?
After this, you can: